Network Automation Cookbook Notes
Network Automation Cookbook Notes#
1. Building Blocks of Ansible#
Ansible is an automation framework / platform. It is written in python and relies on SSH mainly. Started network device support in Ansible 1.9.
- Decent learning curve: builds on yaml and jinja2 templates
- Agentless: Does not need an agent installed on the remote device
- Extensible
- Idempotent: Has a desired state and no matter how many times a play is run it maintains that state (In theory)
Installing Ansible#
- Install python from python.org
-
Install ansible
pip install ansible
Verify it is installed with:
ansible --version
ansible 2.9.7
config file = /etc/ansible/ansible.cfg
configured module search path = ['/Users/stephen/.ansible/plugins/modules', '/usr/share/ansible/plugins/modules']
ansible python module location = /Library/Frameworks/Python.framework/Versions/3.8/lib/python3.8/site-packages/ansible
executable location = /Library/Frameworks/Python.framework/Versions/3.8/bin/ansible
python version = 3.8.5 (v3.8.5:580fbb018f, Jul 20 2020, 12:11:27) [Clang 6.0 (clang-600.0.57)]
You can see it is using python 3, you always want to use python3 as python2 is end of life
Run an ad-hoc command to ping the local machine
$ ansible -m ping localhost
[WARNING]: No inventory was parsed, only implicit localhost is available
localhost | SUCCESS => {
    "changed": false,
    "ping": "pong"
}
Building Ansible Inventory#
Inventory is a file defining the nodes/hosts ansible will manage, and how to connect to them.
Example: hosts
[cisco]
csr1 ansible_host=172.10.1.2
csr2 ansible_host=172.10.1.3

[juniper]
mx1 ansible_host=172.20.1.2
mx2 ansible_host=172.20.1.3

[core]
mx1
mx2

[edge]
csr[1:2]

[network:children]
core
edge
The hosts in the above are csr1, csr2, mx1 and mx2.
They are assigned to group specified by []
They can be grouped by vendor (juniper or IOS) or function (core or edge)
You can also specify an inventory in yaml
Using Ansible’s Variable#
Variables relating to the hosts can be declared in many places.
The best practise is making use of host_vars and group_vars.
group_vars apply to all hosts within that group, host_vars are host specific.
mkdir group_vars
mkdir host_vars
In group_vars/cisco.yml:
os: ios
In group_vars/juniper.yml:
os: junos
In host_vars/csr1.yml:
hostname: edge-csr1
In host_vars/csr2.yml:
hostname: edge-csr2
In host_vars/mx1.yml:
hostname: core-mx1
In host_vars/mx2.yml:
hostname: core-mx2
There are other ways to define variables, using the
varskeyword in the playbook
In addition to use defined variables, ansible creates default variables it builds dynamically.
inventory_hostname- name of the host in the inventoryplay_hosts- a list of all hosts included in the playgroup_names- a list of all the groups a host is part of
Building Ansibles Playbook#
A playbook declares the tasks we want to perform on a set of hosts.
Create a file playbook.yml:
---

  - name: Initial playbook
    hosts: all
    gather_facts: no
    tasks:
      - name: Display Hostname
        debug:
          msg: "Router name is {{ hostname }}"
      - name: Display OS
        debug:
          msg: "{{ hostname }} is running {{ os }}"
Run the playbook with:
ansible-playbook -i hosts playbook.yml
allis a group name built-in to ansible that dynmaically constructs a group for all hosts in the inventory
Ansible’s Conditionals#
Ansible uses the when statement to decide whether to run a given task. If the when statement (a python conditional) evaluates to True it runs, if it evaluates to False it will be skipped.
A single conditional can be given or a list of conditionals, eg:
  - name: Do X
    ....
    when:
      - ip == '192.167.0.1'
      - connected
In conditional_playbook.yml:
---

  - name: Conditional playbook
    hosts: all
    gather_facts: no
    tasks:
      - name: Display Hostname
        debug:
          msg: "Router name is {{ hostname }}"
        when: "'edge' in group_names"

      - name: Display OS
        debug:
          msg: "{{ hostname }} is running {{ os }}"
        when:
          - inventory_hostname == 'mx1'
The conditional must be enclosed in a string when it starts with a string
More info on ansible conditionals
Ansible Loops#
The loops keyword is used to loop over a list.
The with_dicts keywork is used to loop over dictionarties, with item.key being the dictionay key and item.value bing the dicitonary value.
Add to groups_vars/cisco.yml:
os: ios
snmp_servers:
  - 10.1.1.1
  - 10.2.1.1
Add to groups_vars/juniper.yml:
os: junos
users:
  admin: admin123
  oper: oper123
Now the play to loop over the above variables:
---

  - name: Loops over list
    hosts: cisco
    gather_facts: no
    tasks:
      - name: Loop over SNMP servers
        debug:
          msg: "Router {{ hostname }} with snmp server {{ item }}"
        loop: "{{ snmp_servers }}"

  - name: Loops over a dictionary
    hosts: juniper
    gather_facts: no
    tasks:
      - name: Loop over a dictionary
        debug:
          msg: "Router {{ hostname }} with user {{ item.key }} password {{ item.value }}"
        with_dict: "{{ users }}"
Securing Secrets with Ansible Vault#
Passwords shouldn’t be stored in plain text. Ansible vault is used to encrypt and decrypt the secrets when the play is running.
The vault is encrypted with a key file specified by --vault-id.
Create a file with the vault password, vault_pass:
secret_password
Create a secrets file with ansible-vault:
ansible-vault create --vault-id=vault_pass secrets
Add the following secrets (with vim):
ospf_pass: ospf_P@ssword
bgp_pass: bgp_P@ssword
Create this playbook using the secrets file as a vars_file input:
---

  - name: Ansible vault playbook
    hosts: all
    gather_facts: no
    vars_files:
      - secrets
    tasks:
      - name: Output OSPF Password
        debug:
          msg: "Router {{ hostname }} ospf password {{ ospf_pass }}"
        when: inventory_hostname == 'csr1'

      - name: Output BGP Password
        debug:
          msg: "Router {{ hostname }} bgp password {{ bgp_pass }}"
        when: inventory_hostname == 'mx1'
Running the play with the vault_id:
ansible-playbook --vault-id=vault_pass ansible_vault.yml -i hosts
The secrets file can be committed to source control as the contents are AES256 encrypted:
$ANSIBLE_VAULT;1.1;AES256
37306566336133323037613765333835383565396536366263643839366339323264653264346635
3836656237643461653637323534623533636261343838610a376537346534333932323365323132
65353035326364656639363230366436613339613532306338626264663233346432633036353539
6431366438343037300a653334636664383663663733623832623837646335336661633863343235
39626438383334306464353462623338626538393735333233316237333636316339396531333961
63363131663632646636646463366365363735626337386562613361626365636362396633396162
663666393637653766653633656662306538
Do not commit the
vault_idfile
One can also enrypt without a file and rather use a memorised password with the --ask-vault-pass switch.
If no vault password or vault_id is given you will get an error:
ERROR! Attempting to decrypt but no vault secrets found
Using Jinja2 with Ansible#
Jinja2 is a powerful templating engine for python. We can utilise jinja to generate custom configuration files for network devices.
A network.yml group var stored the network config applicable to all devices.
Two jinja tempaltes are then created, one for cisco devices and one for juniper to llop over the ntp_servers.
Ansible’s template module takes 2 parameters:
src: the jinja2 templatedest: specifies the output file
The inventory_hostname is used to make a unique output.
By default the template module creates the file on the remote managed node, however this is not possible as they are network devices.
Hence we use delegate_to to run the task locally on the ansible control node.
Add group_vars/network.yml:
ntp_servers:
  - 172.20.1.1
  - 172.20.2.1
Create a new templates directory and create ios_basic.j2:
hostname {{ hostname }}
!
{% for server in ntp_servers %}
ntp {{ server }}
{% endfor %}
!
And a tempaltes/junos_basic.j2:
set system host-name {{ hostname }}
{% for server in ntp_servers %}
set system ntp server {{ server }}
{% endfor %}
Create a playbook jinja_playbook.yml:
---
  - name: Generate Cisco config from Jinja2
    hosts: localhost
    gather_facts: no
    tasks:
      - name: Create Configs Directory
        file: path=configs state=directory

  - name: Generate Cisco config from Jinja2
    hosts: cisco
    gather_facts: no
    tasks:
      - name: Generate Cisco Basic Config
        template:
          src: "templates/ios_basic.j2"
          dest: "configs/{{inventory_hostname}}.cfg"
        delegate_to: localhost

  - name: Generate Juniper config from Jinja2
    hosts: juniper
    gather_facts: no
    tasks:
      - name: Generate Juniper Basic Config
        template:
          src: "templates/junos_basic.j2"
          dest: "configs/{{inventory_hostname}}.cfg"
        delegate_to: localhost
Generate the config with:
ansible-playbook -i hosts jinja_playbook.yml
The first play creates the configs diredctory locally. The second play creates the cisco configs for each host. The third play create the juniper configs for each host.
Examples of the config created:
csr1.cfg:
hostname edge-csr1
!
ntp 172.20.1.1
ntp 172.20.2.1
!
mx1.cfg:
set system host-name core-mx1
set system ntp server 172.20.1.1
set system ntp server 172.20.2.1
The routers should never be the source of truth. The source data for your routers should reside elsewhere. (My opinion)
More on the Ansible template module
Ansible Filters#
Filters are used to transform and manipulate data. Ansible filters are derived from jinja2 filters.
You might need python’s
netaddrpackage for network filters
Create a new play filters_playbook.yml:
---
  - name: Ansible Filters
    hosts: csr1
    gather_facts: no
    vars:
      interfaces:
        - { port: FastEthernet0/0, prefix: 10.1.1.0/24 }
        - { port: FastEthernet1/0, prefix: 10.1.2.0/24 }
    tasks:
      - name: Generate Interface Config
        blockinfile:
          block: |
            hostname {{ hostname | upper }}
            {% for intf in interfaces %}
            !
            interface {{ intf.port }}
              ip address {{intf.prefix | ipv4(1) | ipv4('address') }} {{intf.prefix | ipv4('netmask') }}
            !
            {% endfor %}
          dest: "configs/csr1_interfaces.cfg"
          create: yes
        delegate_to: localhost
Output of csr_interfaces.cfg:
# BEGIN ANSIBLE MANAGED BLOCK
hostname EDGE-CSR1
!
interface FastEthernet0/0
ip address 10.1.1.1 255.255.255.0
!
!
interface FastEthernet1/0
ip address 10.1.2.1 255.255.255.0
!
# END ANSIBLE MANAGED BLOCK
blockinfile is similar to template but uses text in the file as the source, not a file.
Remeber to set
gather_facts: nootherwise ansible will attempt to log into the device and gather facts first
{{ hostname | upper }}- uppercase{{ intf.prefix | ipv4(1) | ipv4('address') }}-ipv4(1)prints the first ip in the prefix,ipv4('address')gets only the address portion of the prefix{{ intf.prefix | ipv4('netmask') }}- get the netmask for the prefix
Ansible Tags#
Tool to tag specific tasks in a large ansible playbook. So we can choose what tasks are run based on the tags.
This allows us to run the same playbook for different scenarios.
With no tags specified - all tasks will be run
Create tags_playbook.yml:
---
  - name: Using Ansible Tags
    hosts: cisco
    gather_facts: no
    tasks:
      - name: Print OSPF
        debug:
          msg: "Router {{ hostname }} will Run OSPF"
        tags: [ospf, routing]

      - name: Print BGP
        debug:
          msg: "Router {{ hostname }} will Run BGP"
        tags:
          - bgp
          - routing

      - name: Print NTP
        debug:
          msg: "Router {{ hostname }} will run NTP"
        tags: ntp
Run the play with different tags:
$ ansible-playbook tags_playbook.yml -i hosts --tags ospf

PLAY [Using Ansible Tags] ***********************************************************************

TASK [Print OSPF] *******************************************************************************
ok: [csr1] => {
    "msg": "Router edge-csr1 will Run OSPF"
}
ok: [csr2] => {
    "msg": "Router edge-csr2 will Run OSPF"
}

PLAY RECAP **************************************************************************************
csr1                       : ok=1    changed=0    unreachable=0    failed=0    skipped=0    rescued=0    ignored=0
csr2                       : ok=1    changed=0    unreachable=0    failed=0    skipped=0    rescued=0    ignored=0
and routing:
$ ansible-playbook tags_playbook.yml -i hosts --tags routing

PLAY [Using Ansible Tags] ***********************************************************************

TASK [Print OSPF] *******************************************************************************
ok: [csr1] => {
    "msg": "Router edge-csr1 will Run OSPF"
}
ok: [csr2] => {
    "msg": "Router edge-csr2 will Run OSPF"
}

TASK [Print BGP] ********************************************************************************
ok: [csr1] => {
    "msg": "Router edge-csr1 will Run BGP"
}
ok: [csr2] => {
    "msg": "Router edge-csr2 will Run BGP"
}

PLAY RECAP **************************************************************************************
csr1                       : ok=2    changed=0    unreachable=0    failed=0    skipped=0    rescued=0    ignored=0
csr2                       : ok=2    changed=0    unreachable=0    failed=0    skipped=0    rescued=0    ignored=0
Customising Ansible Settings#
Settings can be adjusted with ansible.cfg file.
Create a ansible.cdfg file in the same directory as you are working.
[defaults]
inventory=hosts
vault_password_file=vault_pass
gathering=explicit
The default config file is at /etc/ansible/ansible.cfg but this will affect every playbook on the control machine. It is better to include a ansible.cfg in the project directory.
inventory: sets the default inventory so you can stop using-i hostsvault_password_file: sets the vault password so we needn’t use--vault-idgathering = explicit: By default ansible runs thesetupmodule to gather facts of the managed nodes. It is not compatible with network nodes as they needpython. This disablesgather_factsby default.
Using Ansible Roles#
Ansible role is collected package of tasks, templates, handlers. It promote code re-use.
mkdir roles
cd roles
ansible-galaxy init basic_config
This creates a default role layout.
In roles/basic_config/vars/main.yml:
---
config_dir: basic_config
In roles/basic_config/tasks/main.yml:
---
- name: Create config directory
  file:
    path: "{{ config_dir }}"
    state: directory
  run_once: yes

- name: Generate Cisco basic config
  template:
    src: "{{ os }}.j2"
    dest: "{{ config_dir }}/{{ inventory_hostname }}.cfg"
In roles/basic_config/templates/ios.j2:
hostname {{ hostname }}
!
{% for server in ntp_servers %}
ntp {{ server }}
{% endfor %}
In roles/basic_config/tempaltes_junos.j2:
set system host-name {{ hostname }}
{% for server in ntp_servers %}
set system ntp server {{ server }}
{% endfor %}
Create a new playbook in the chapter root role_playbook.yml:
---
  - name: Build basic config using Roles
    hosts: all
    connection: local
    roles:
      - basic_config
Run the play:
ansible-playbook role_playbook.yml
This does the same as our previous work but in a more reusable way where we can import the role.
Ansible looks for roles:
- In the current working directory
rolesfolder /etc/ansible/roles
2. Managing Cisco iOS devices using Ansible#
Get the book if you want more info on this, I might revisit it but I’m more interested in the Juniper info for now…
3. Automating Juniper Devices in Service Providers using Ansible#
First lets understand what a P Router and PE router is.
A P (Provider) router doesn’t have Customer network routes. Does not require MP-iBGP. This router only functions within the service provider network. A PE (Provider Edge) Router does have Customer network routes. Requires MP-iBGP. The router between different service providers networks. A CE (Customer Edge) Router is a router at the customer premises, connecting to the PE. It exchanges routes with the corresponding VRF on the PE router.
VRFs and VPNs are only relevant on PE routers.
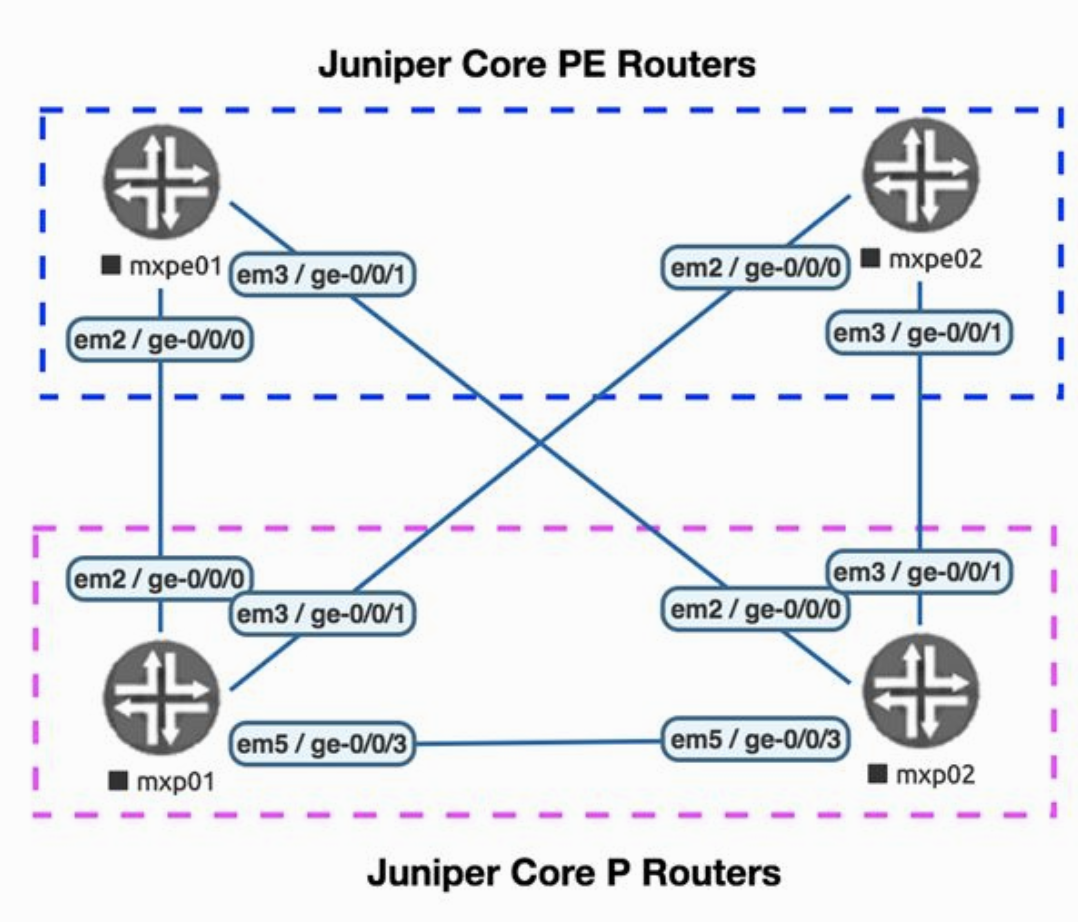
The topology:
|device|role|vendor|maangement_port|management_ip| |mxp01|P router|v14.1|fxp0|172.20.1.2| |mxp02|P router|v14.1|fxp0|172.20.1.3| |mxpe01|PE Router|v14.1|fxp0|172.20.1.4| |mxpe02|PE Router|v17.1|fxp0|172.20.1.5|
We require a Juniper Virtual MX v14 and v17.
Ensure virtualbox and vagrant are installed folow this guide
vagrant box add juniper/vqfx10k-re
vagrant box add juniper/vqfx10k-pfe

ansible-galaxy install Juniper.junos
pip install junos-eznc
pip install jxmlease

git clone https://github.com/Juniper/vqfx10k-vagrant.git
cd vqfx10k-vagrant/full-2qfx
vagrant up
If there are any issues do:
vagrant destroy
vagrant up --provision
To avoid many issues just use a virtual environment.
On mac ensure the corrent python version is being used by default:
ln -s -f /usr/local/bin/python3.8 /usr/local/bin/python
Also add interpreter_python = /usr/local/bin/python
This will create a similar topology of the one in the book.
vqfx1
vqfx2
This setup is very CPU and memory intensive.
In that case it might be better to use light-2qfx-2srv - but that is servers and not routing engines…so maybe light-2qfx
I will use light-2qfx
Creating the Inventory#
mkdir ch3_junos
touch hosts
The host file can be found at ./light-2qfx/.vagrant/provisioners/ansible/inventory/vagrant_ansible_inventory
vqfx1 ansible_host=127.0.0.1 ansible_port=2222 ansible_user='vagrant' ansible_ssh_private_key_file='~/.vagrant.d/insecure_private_key'
vqfx2 ansible_host=127.0.0.1 ansible_port=2200 ansible_user='vagrant' ansible_ssh_private_key_file='~/.vagrant.d/insecure_private_key'

[vqfx10k]
vqfx1
vqfx2

[all:children]
vqfx10k
We’ll update this and pretend that vqfx1 is a p router and vqfx2 is a pe router. If you have more resources go ahead and use the full-4 repo.
Add the following to the inventory:
[p]
vqfx1

[pe]
vqfx2

[junos]
vqfx1
vqfx2

[core:children]
p
pe
Then add an ansible.cfg in the repo to make our lives a bit easier:
[defaults]
inventory=hosts
retry_files_enabled=False
gathering=explicit
host_key_checking=False
interpreter_python = /usr/local/bin/python
You can check the inventory is setup correctly with:
ansible-inventory --list
or for a yaml version:
ansible-inventory -y --list
Connecting and Authenticating to Juniper Devices#
With the
vqfx10k-vagrantrepo, the connectivity with ssh is setup for you during provisioning.
Generate an SSH key pair
ssh-keygen -t rsa -b 2048 -f Ansible_SSH_key
Then add it to the router for the admin user:
[edit system login]
Ansible@mxpe01# show
user admin {
  uid 2001;
  class super-user;
  authentication {
    SSH-rsa "ssh-rsa AAAAB3NzaC1yc2EAAAADAQABAAABAQC8vklGlnyKKmu0A+N/W/h5YlkvzjRhO91JEsOgYBiV/jLjNdm4BhREnZOMxPKoIS3MVcSw9GcuTYf7K8fPnHXJ0CDTI6esV5KqP55foN/hS+X3wIl1KVHoun6Szzkau+w+N8TdIOlS6+bmFjWdeQeFmjR9se2O5Y4BVuBSbRZUZ/mLjsUC9OknlOU7b+Og+m5J0b42k6KBbaWneV0vbMn3xxR8BPf2ZnkxSHYvpOtsFLludpxAlnqJj56JRRdNpasQJR2I7a/GXEwvmkx2kWy9qNX4VkIky4nk63+0yhTTAtsbk5m/eXk3gpj+HDw1oYchRhgxCLkqNXFfcjLb5ilR";
  }
}
Test we can login:
ansible all -m ping -u admin --private-key Ansible_SSH_key -c network_cli
Apparently we need to set the ansible_network_os in the inventory
vqfx1 | FAILED! => {
    "msg": "Unable to automatically determine host network os. Please manually configure ansible_network_os value for this host"
}
So I updated it and it worked:
ansible all -m ping -u vagrant -c network_cli

vqfx2 | SUCCESS => {
    "changed": false,
    "ping": "pong"
}
vqfx1 | SUCCESS => {
    "changed": false,
    "ping": "pong"
}
Since we set the private key to use in the inventory we can omit the --private-key switch.
You can also use group vars to specifiy the ssh key to use:
In group_vars/junos.yml:
ansible_user: admin
ansible_SSH_private_key_file: Ansible_SSH_key
Enabling NETCONF on Junos#
NETCONF provides several advantages over SSH.
Create a playbook pb_enable_netconf.yml
---
- name: Build Juniper SP Network
  hosts: junos
  tasks:
    - name: "Enable NETCONF"
      junos_netconf:
        netconf_port: 830
        state: present
      vars:
        ansible_connection: network_cli
      tags: netconf”
and run it with:
ansible-playbook -i hosts pb_enable_netconf.yml
Add to groups_vars/junos.yml:
ansible_network_os: junos
ansible_connection: netconf
So we SSH in and enable netconf, then update the conenction to use netconf.
To use network_cli connection you need to set ansible_network_os = junos.
However now instead of ansible_connection: network_cli we can use ansible_connection: netconf in future.
Log into the device and check netconf is enabled:
vagrant ssh vqfx1
Checking on the device:
vagrant@vqfx2> show configuration system
services {
    ssh {
        root-login allow;
    }
    netconf {
        ssh {
            port 830;
        }
    }
}
Configuring Generic system options on juniper devices#
Define some system level parameters in group_vars/all.yml:
tmp_dir: ./tmp
config_dir: ./configs
global:
  dns:
  - 192.71.245.208
  - 172.104.136.243
  root_pwd: $1$ciI4raxU$XfCVzABJKdALim0aWVMql0
  users:
  -   role: super-user
      SSH_key: Ansible_SSH_key.pub
      username: admin
  -   hash: $1$mR940Z9C$ipX9sLKTRDeljQXvWFfJm1
      passwd: 14161C180506262E757A60
      role: super-user
      username: ansible
Create a playbook pb_basic_config.yml:
---
- name: Configure Juniper Devices
  hosts: junos
  tasks:
    - name: "Configure Basic System config"
      junos_system:
        hostname: "{{ inventory_hostname }}"
        name_servers: "{{ global.dns }}"
        state: present
    - name: "Configure Users"
      junos_user:
        name: "{{ item.username }}"
        role: "{{ item.role }}"
        sshkey: "{{ lookup ('file', item.SSH_key) }}"
        state: present
      with_items: "{{ global.users | selectattr('SSH_key','defined') | list }}"
Ensure you are running a recent ansible version, ansible 2.9.7 fails with this error:
Unable to decode JSON from response to get_capabilities()
Ansible version:
$ ansible --version
ansible 2.10.4
Run it:
$ ansible-playbook pb_basic_config.yml

PLAY [Configure Juniper Devices] *********************************************************************************************************************

TASK [Configure Basic System config] *****************************************************************************************************************
ok: [vqfx2]
ok: [vqfx1]

TASK [Configure Users] *******************************************************************************************************************************
changed: [vqfx1] => (item={'role': 'super-user', 'SSH_key': 'Ansible_SSH_key.pub', 'username': 'admin'})
changed: [vqfx2] => (item={'role': 'super-user', 'SSH_key': 'Ansible_SSH_key.pub', 'username': 'admin'})

PLAY RECAP *******************************************************************************************************************************************
vqfx1                      : ok=2    changed=1    unreachable=0    failed=0    skipped=0    rescued=0    ignored=0
vqfx2                      : ok=2    changed=1    unreachable=0    failed=0    skipped=0    rescued=0    ignored=0
junos_systemmodule lets you set dns and hostname.junos_usermodules lets you set up users
Sometimes Jinja is needed instead of the module
To view whether it worked:
show configuration system
We are going to create a role for the templated config.
In the below task a config directory is kept to store the device configuration, each segment is seperated into a seperate jinja2 template: MGMT, OSPF, BGP…
Create roles/build_router_config/tasks/build_config_dir.yml:
---
- name: Create Config Directory
  file:
    path: "{{config_dir}}"
    state: directory
  run_once: yes

- name: Create Temp Directory per Node
  file:
    path: "{{tmp_dir}}/{{inventory_hostname}}"
    state: directory

- name: SET FACT >> Build Directory
  set_fact:
    build_dir: "{{tmp_dir}}/{{inventory_hostname}}"
In roles/build_router_config/templates/junos/mgmt.j2:
system {
    host-name {{inventory_hostname}};
    no-redirects;
{%  if global.dns is defined %}
    name-server {
{%      for dns_server in global.dns %}
        {{dns_server}};
{%      endfor %}
    }
{%  endif %}
    root-authentication {
        encrypted-password "{{ global.root_pwd}}"; ## SECRET-DATA
    }
    login {
{%      for user in global.users if user.hash is defined %}
        user {{ user.username }} {
            class super-user;
            authentication {
                encrypted-password "{{user.hash}}"; ## SECRET-DATA
            }
        }
{%      endfor %}
{%      for user in global.users if user.SSH_key is defined %}
        user {{ user.username }} {
            class {{ user.role }};
            authentication {
                SSH-rsa "{{lookup('file',user.SSH_key)}}"; ## SECRET-DATA
            }
        }
{%      endfor %}
    }
}
In roles/build_router_config/tasks/build_device_config.yml:
---
- name: "System Configuration"
  template:
    src: "{{Ansible_network_os}}/mgmt.j2"
    dest: "{{build_dir}}/00_mgmt.cfg"
  tags: mgmt
Then inlcude the above tasks in the main task…main.yml:
---
- name: Build Required Directories
  import_tasks: build_config_dir.yml

- name: Build the device Configuration
  import_tasks: build_device_config.yml

- name: "Remove Old Assembled Config"
  file:
    path: "{{config_dir}}/{{ inventory_hostname }}.cfg"
    state: absent

- name: Build Final Device Configuration
  assemble:
    src: "{{ build_dir }}"
    dest: "{{config_dir}}/{{ inventory_hostname }}.cfg"

- name: Remove Build Directory
  file: path={{ tmp_dir }} state=absent
  run_once: yes
importantly
assemblewill combine all the config from the build dirctory
Create the playbook for the roles: pb_juniper_net_build.yml
- name: Build device config
  hosts: junos
  tasks:
    - name: Build Device Configuration
      import_role:
        name: build_router_config
      vars:
        Ansible_connection: local
      tags: build
Remember config is always built locally - there is no need to connect to the remote machines
Run the playbook:
ansible-playbook pb_juniper_net_build.yml
Once successful you will have a config directory with:
vqfx1.cfg
vqfx2.cfg
Configuring Interfaces on Juniper Devices#
Setting paramters such as the ip address or MTU (Maximum Transmission Unit)
Update group_vars/all.yml to include all P2P (point-to-point) and loopback interfaces on the sample topology (since we are only using 2 devices here we might have to change it up a bit)
global: p2p_prefix: 31 mtu: 1500
p2p_ip: vqfx1: - {port: ge-0/0/0, ip: 10.1.1.2 , peer: vqfx2, pport: ge-0/0/0, peer_ip: 10.1.1.3} vqfx2: - {port: ge-0/0/0, ip: 10.1.1.3 , peer: vqfx1, pport: ge-0/0/0, peer_ip: 10.1.1.2} lo_ip: vqfx1: 10.100.1.254/32 vqfx2: 10.100.1.1/32
Then update the playbook to update the interfaces on the router:
- name: "Configure the Physical Interfaces"
  junos_interface:
    name: "{{ item.port }}"
    enabled: true
    description: "peer:{{item.peer}} remote_port:{{item.pport }}"
    mtu: "{{ global.mtu | default(1500) }}"
  with_items: "{{p2p_ip[inventory_hostname]}}"
  tags: intf

- name: "Configure IP Addresses"
  junos_l3_interface:
    name: "{{ item.port }}"
    ipv4: "{{ item.ip }}/{{ global.p2p_prefix }}"
    state: present
  with_items: "{{ p2p_ip[inventory_hostname] }}"
  tags: intf
Run the playbook:
ansible-playbook pb_basic_config.yml

TASK [Configure Users] *******************************************************************************************************************************
ok: [vqfx1] => (item={'role': 'super-user', 'SSH_key': 'Ansible_SSH_key.pub', 'username': 'admin'})
ok: [vqfx2] => (item={'role': 'super-user', 'SSH_key': 'Ansible_SSH_key.pub', 'username': 'admin'})

TASK [Configure the Physical Interfaces] *************************************************************************************************************
ok: [vqfx2] => (item={'port': 'ge-0/0/0', 'ip': '10.1.1.3', 'peer': 'vqfx1', 'pport': 'ge-0/0/0', 'peer_ip': '10.1.1.2'})
ok: [vqfx1] => (item={'port': 'ge-0/0/0', 'ip': '10.1.1.2', 'peer': 'vqfx2', 'pport': 'ge-0/0/0', 'peer_ip': '10.1.1.3'})

TASK [Configure IP Addresses] ************************************************************************************************************************
changed: [vqfx2] => (item={'port': 'ge-0/0/0', 'ip': '10.1.1.3', 'peer': 'vqfx1', 'pport': 'ge-0/0/0', 'peer_ip': '10.1.1.2'})
changed: [vqfx1] => (item={'port': 'ge-0/0/0', 'ip': '10.1.1.2', 'peer': 'vqfx2', 'pport': 'ge-0/0/0', 'peer_ip': '10.1.1.3'})
junos_interfacemodule enables the interface and set basic paramtersjunos_l3_interfacemodule to set the correct ip address on all the interfaces
On the devices we can see the interfaces enabled:
vagrant@vqfx2> show configuration interfaces
ge-0/0/0 {
    description "peer:vqfx1 remote_port:ge-0/0/0";
    mtu 1500;
    unit 0 {
        family inet {
            address 10.1.1.3/31;
        }
    }
}
vagrant@vqfx1> show configuration interfaces
ge-0/0/0 {
    description "peer:vqfx2 remote_port:ge-0/0/0";
    mtu 1500;
    unit 0 {
        family inet {
            address 10.1.1.2/31;
        }
    }
}
Some paramters are not covered by the declarative ansible configuration. We can use jinja2 templates as outlined earlier.
In roles/build_router_config/tasks/templates/junos/intf.j2:
interfaces {
{% for intf in p2p_ip[inventory_hostname] | sort(attribute='port') %}
  {{ intf.port.split('.')[0] }} {
    description "peer:{{intf.peer}} -- peer_port: {{intf.pport}}"
    unit 0 {
      family inet {
        address {{intf.ip}}/{{global.p2p_prefix}};
      }
      family mpls;
    }
  }
{% endfor %}
  lo0 {
    unit 0 {
      family inet {
        address {{lo_ip[inventory_hostname]}};
      }
    }
  }
}
Add to build_device_config.yml:
- name: "Interface Configuration"
  template:
    src: "{{ ansible_network_os}}/intf.j2"
    dest: "{{build_dir}}/01_intf.cfg"
  tags: intf
Configuring OSPF on Junos Devices#
I am going to skip this…check the book for info
Configuring MPLS on Junos Devices#
We are going to configure Multi-packet Layer Switching (MPLS), LDP (label Distribution Protocol) and Resource Reservation Protocol (RSVP)
Create templates/junos/mpls.j2:
protocols {
{#
**************************************************
###         LDP  Variables                  ######
**************************************************
#}
    ldp {
{%      for intf in p2p_ip[inventory_hostname]|sort(attribute='port') %}
        interface {{intf.port}}.{{intf.vlan|default('0')}};
{%      endfor %}
        interface lo0.0;
    }
{#
**************************************************
###         RSVP  Variables                  ######
**************************************************
    #}
    rsvp {
{%      for intf in p2p_ip[inventory_hostname]|sort(attribute='port') %}
        interface {{intf.port}}.{{intf.vlan|default('0')}};
{%      endfor %}
    }
{#
**************************************************
###         MPLS and LLDP  Variables        ######
**************************************************
#}
    mpls {
{%      for intf in p2p_ip[inventory_hostname]|sort(attribute='port') %}
        interface {{intf.port}}.{{intf.vlan|default('0')}};
{%      endfor %}
    }
    lldp {
{%      for intf in p2p_ip[inventory_hostname]|sort(attribute='port') %}
        interface {{intf.port}};
{%      endfor %}
    }
}
Then add to roles/build_config/tasks/pb_juniper_net_build.yml
- name: "MPLS Configuration"
  template:
    src: "{{Ansible_network_os}}/mpls.j2"
    dest: "{{config_dir}}/{{ inventory_hostname }}/03_mpls.cfg"
  tags: mpls
This creates the config:
protocols {
    ldp {
        interface ge-0/0/0.0;
        interface lo0.0;
    }
    rsvp {
        interface ge-0/0/0.0;
    }
    mpls {
        interface ge-0/0/0.0;
    }
    lldp {
        interface ge-0/0/0;
    }
}
Configuring BGP on Juniper Devices#
Info on how to setup BGP Route Reflectors (RR) as well as BGP address families for VPN (Virtual Private Network).
Update group_vars/all.yml with this info:
bgp_topo:
  rr: vqfx1
  af:
  - inet
  - inet-vpn
For each node in the topology create a bgp.yml file under host_vars…check the repo for an example
Then create a tempalte templates/junos/bgp.j2:
protocols {
{#
**************************************************
###         BGP  Variables                  ######
**************************************************
#}
{%  if bgp_peers is defined %}
    bgp {
        group Core {
            type internal;
            local-address {{ lo_ip[inventory_hostname] | ipaddr('address')}};
{%          if bgp_topo.rr == inventory_hostname %}
            cluster {{ lo_ip[inventory_hostname].split('/')[0] }};
{%          endif %}
{%          for af in bgp_topo.af %}
{%          if af == 'inet' %}
            family inet {
                unicast;
            }
{%          endif %}
{%          if af == 'inet-vpn' %}
            family inet-vpn {
                unicast;
            }
{%          endif %}
{%          if af == 'evpn' %}
            family evpn {
                signaling;
            }
{%          endif %}
{%          endfor %}
{%          for p in bgp_peers %}
            neighbor {{ p.peer}};
{%          endfor %}
        }
    }
{%  endif %}
}
Then add the template module to tasks/build_device_config.yml:
- name: "BGP Configuration"
  template:
    src: "{{ansible_network_os}}/bgp.j2"
    dest: "{{build_dir}}/04_bgp.cfg"
  tags: bgp
Only difference here is there is node (host) specific variables for bgp declated in
host_vars
Then run it:
ansible-playbook pb_junper_net_build.yml
This creates:
protocols {
    bgp {
        group Core {
            type internal;
            local-address 10.100.1.254;
            cluster 10.100.1.254;
            family inet {
                unicast;
            }
            family inet-vpn {
                unicast;
            }
            neighbor 10.100.1.1;
            neighbor 10.100.1.2;
        }
    }
}
Deploying the Configuration to Juniper Devices#
Add the following task to pb_junper_net_build.yml:
- name: "Deploy Configuration"
  junos_config:
    src: "{{config_dir}}/{{ inventory_hostname }}.cfg"
The
junos_configmodule is used to push the respecitive config to every host in our inventory.
We can use the update paramter to specify how the ush will merge with existing data:
merge- configuratioon from our file is merged with the device’s candidate configuration (default)update- configuraiton from our file will override the managed devices config
We can use --check mode to push the changes to the device without applying them:
ansible-playbook pb_juniper_net_build.yml -l vqfx2 --check --diff
The junos module also supports rollback:
- name: “Rollback config” junos_config: rollback: “{{ rollback | default(‘1’) | int }}” tags: rollback, never
That will only run when the rollback tag is present.
ansible-playbook pb_juniper_net_build.yml --tags rollback -l vqfx2
We can specify a rollback point further back:
ansible-playbook pb_juniper_net_build.yml --tags rollback -l mxpe01 –e rollback=2
For some reason I got an error when applying the config:
TASK [Deploy Configuration] **************************************************************************************************************************
fatal: [vqfx2]: FAILED! => {"changed": false, "msg": "<?xml version=\"1.0\" encoding=\"UTF-8\"?><rpc-reply xmlns=\"urn:ietf:params:xml:ns:netconf:base:1.0\" xmlns:junos=\"http://xml.juniper.net/junos/19.4R0/junos\" xmlns:nc=\"urn:ietf:params:xml:ns:netconf:base:1.0\" message-id=\"urn:uuid:7b5b4635-e454-4fd0-a629-198620abc8d4\">\n<load-configuration-results>\n<rpc-error>\n<error-type>protocol</error-type>\n<error-tag>operation-failed</error-tag>\n<error-severity>error</error-severity>\n<error-message>syntax error</error-message>\n<error-info>\n<bad-element>SSH-rsa</bad-element>\n</error-info>\n</rpc-error>\n<rpc-error>\n<error-severity>warning</error-severity>\n<error-path>[edit system login user admin]</error-path>\n<error-message>mgd: statement has no contents; ignored</error-message>\n<error-info>\n<bad-element>authentication</bad-element>\n</error-info>\n</rpc-error>\n</load-configuration-results>\n</rpc-reply>"}
Ah it looks like SSH-rsa is a bad-element. Changing the mgmt.j2 template with ssh-rsa worked! However another error…
The error was: ansible.module_utils.connection.ConnectionError: b'error: Error in neighbor 10.100.1.254 of group Core:\nmust define local autonomous system when enabling BGP
I fixed this issue by looking at the templates from the code for the book and ensuring it matched what I had
When you configure the local-as statement, you must specify an AS number. You can specify a number from 1 through 4,294,967,295 in plain-number format - juniper ASN docs
More info on the junos config module
Configuring L3VPN Services on Juniper Devices#
Create the L3VPN variable file l3vpn.yml:
l3vpns:
  vpna:
      state: present
      rt: "target:{{bgp_asn}}:10"
      rd: "1:10"
      sites:
          - node: vqfx1
            port: ge-0/0/3.10
            ip: 172.10.1.1/24
  vpnb:
      state: present
      rt: "target:{{bgp_asn}}:20"
      rd: "1:20"
      sites:
          - node: vqfx1
            port: ge-0/0/3.20
            ip: 172.20.1.1/24
Create a playbook to deploy the PE (Provider Edge) - CE (Customer Edge) links: pb_junos_l3vpn.yml:
This is only done on the pe routers
---
- name: "Deploy L3VPNs on Juniper Devices"
  hosts: pe
  vars_files:
    - "l3vpn.yml"
  tasks:
    - name: "Set VPN Interfaces"
      set_fact:
        l3vpn_intfs: "{{ l3vpn_intfs|default([]) +
          l3vpns[item.key].sites |
 selectattr('node','equalto',inventory_hostname) | list}}"
      with_dict: "{{l3vpns}}"
      delegate_to: localhost

    - name: "Configure Interfaces for L3VPN Sites"
      junos_config:
        lines:
          - set interfaces {{ item.port.split('.')[0]}} vlan-tagging
          - set interfaces {{ item.port}} vlan-id {{ item.port.split('.')[1] }}
      loop: "{{ l3vpn_intfs }}"
We get all the relevant interfaces for a specific node, with the interface variable we configure the interface and then the vlans (Virtual LAN’s)
Set the P2P IP address on the PE-CE link:
- name: "Configure IP address for L3VPN Interfaces"
  junos_l3_interface:
    name: "{{ item.port.split('.')[0]}}"
    ipv4: "{{ item.ip }}"
    unit: "{{ item.port.split('.')[1] }}"
  loop: "{{l3vpn_intfs}}"
  tags: intf_ip
junos_l3_interfacemodule is used to apply IPv4 addresses to the interfaces
Configure the VRF (Virtual Routing and Forwarding) on the PE node
- name: "Configure L3VPNs"
  junos_vrf:
    name: "{{ item.key }}"
    rd: "{{item.value.rd}}"
    target: "{{ item.value.rt }}"
    interfaces: "{{ l3vpns[item.key].sites |
                    map(attribute='port') | list }}"
    state: "{{ item.value.state }}"
  with_dict: "{{l3vpns}}"
  when: inventory_hostname in (l3vpns[item.key].sites | map(attribute='node') | list)
  tags: l3vpn
Use
junos_vrfto configure the correct routing instances on the node
Check that the routing instance is configured
vagrant ssh vqfx2
vpna {
    instance-type vrf;
    interface ge-0/0/3.10;
    route-distinguisher 1:10;
    vrf-target target:65400:10;
    vrf-table-label;
}
vpnb {
    instance-type vrf;
    interface ge-0/0/3.20;
    route-distinguisher 1:20;
    vrf-target target:65400:20;
    vrf-table-label;
}
I made a mistake earlier but because we used the group pe it was not applied…
It is important to make use of groups
Check out the junos VRF module
Gathering Juniper Device Facts with Ansible#
Basic health checks to validate operational state
Create a playbook pb_juniper_facts.yml:
---
- name: Collect and Validate Juniper Facts
  hosts: junos
  tasks:
    - name: Collect Juniper Facts
      junos_facts:

    # - debug: var=hostvars[inventory_hostname]

    - name: Create Facts Folder
      file: path=device_facts state=directory
      run_once: yes

    - name: Create Basic Device Facts Report
      blockinfile:
        path: "device_facts/{{ inventory_hostname }}.txt"
        block: |
          device_name: {{ ansible_net_hostname }}
          model: {{ ansible_net_system }} {{ ansible_net_model }}
          os_version: {{ ansible_net_version }}
          serial_number: {{ ansible_net_serialnum }}
        create: yes

    - name: Validate all Core Interface are Operational
      assert:
        that:
          - ansible_net_interfaces[item.port]['oper-status'] == 'up'
        fail_msg: "Interface {{item.port}} is not Operational "
      loop: "{{ p2p_ip[inventory_hostname] }}"
The junos_facts module is used to get the facts - we can assert some basic operational state
You can debug the facts with:
- name: Debug all facts for a host
  debug:
    var: ansible_facts

"net_python_version": "3.8.5",
"net_routing_engines": {},
"net_serialnum": "VM5E2567B514",
"net_system": "junos",
"net_version": "19.4R1.10",
The facts were used to build a text file
Next we assert that the interfaces are up and running:
For:
p2p_ip:
vqfx1:
  - {port: ge-0/0/0, ip: 10.1.1.2 , peer: vqfx2, pport: ge-0/0/0, peer_ip: 10.1.1.3}
vqfx2:
  - {port: ge-0/0/0, ip: 10.1.1.3 , peer: vqfx1, pport: ge-0/0/0, peer_ip: 10.1.1.2}
We want to ensure ge-0/0/0 is up on the vqfx1 device
"net_hostname": "vqfx1",
"net_interfaces": {
    ".local.": {
        "admin-status": "up",
        "macaddress": "Unspecified",
        "mtu": "Unlimited",
        "oper-status": "up",
        "speed": "Unlimited",
        "type": "Loopback"
    },
    "bme0": {
        "admin-status": "up",
        "macaddress": "02:00:00:00:00:0a",
        "mtu": "2000",
        "oper-status": "up",
        "speed": "Unspecified",
        "type": "Ethernet"
    },
Remember the devices we are using are virtual switches the vqfx-10000
To debug the device try these commands:
show interfaces terse
show interfaces descriptions
vagrant@vqfx1> show interfaces ge-0/0/0
error: device ge-0/0/0 not found
For me the
ge-0/0/0is not even found - so the assertions fail
More on Junos Facts
Validating Network Reachability on Juniper Devices#
Validating network reachability with a ping
Create a playbook pb_junos_ping.yml:
---
- name: "Validate Core Reachability"
  hosts: junos
  tasks:
    - name: "Ping Across All Loopback Interfaces"
      junos_ping:
        dest: "{{ item.value.split('/')[0] }}"
        interface: lo0.0
        size: 512
      with_dict: "{{lo_ip}}"
      vars:
        ansible_connection: network_cli
      register: ping_rst
      ignore_errors: yes

    - debug: var=ping_rst
      run_once: yes

    - name: Create Ping Report
      blockinfile:
        block: |
            Src Node | Dest Node | Dest IP | Packet Loss | Delay |
            -----| ------------| ------------| ------|
            {%  for node in play_hosts %}
            {%    for result in hostvars[node].ping_rst.results %}
            {%      if result.rtt is defined %}
            {{ node }} | {{ result.item.key }} |{{ result.item.value }} | {{ result.packet_loss }} | {{ result.rtt.avg }}
            {%      else %}
            {{ node }} | {{ result.item.key }} |{{ result.item.value }} | {{ result.packet_loss }} | 'N/A'
            {%      endif %}
            {%    endfor %}
            {%  endfor %}
        path: ./ping_report.md
        create: yes
      run_once: yes
Using this previously defined variable:
lo_ip:
  vqfx1: 10.100.1.254/32
  vqfx2: 10.100.1.1/32
Run the playbook:
ansible-playbook pb_junos_ping.yml
The created ping report looks like this:
Src Node | Dest Node | Dest IP | Packet Loss | Delay |
-----| ------------| ------------| ------|
vqfx1 | vqfx1 |10.100.1.254/32 | 0% | 0.3
vqfx1 | vqfx2 |10.100.1.1/32 | 100% | 'N/A'
vqfx2 | vqfx1 |10.100.1.254/32 | 100% | 'N/A'
vqfx2 | vqfx2 |10.100.1.1/32 | 0% | 0.18
The
junos_pingmodule pings all the loopback interfaces on the devices
ignore_errors is set to yes in order to ignore failed pings
block_in_file is used to render the markdown file
Retrieving Operational Data from Juniper Devices#
You can run junos commands like:
show bgp neighbor
show bgp summary
Lets get BGP peers, create pb_get_bgp_peers.yml:
---

- name: "Get BGP Status"
  hosts: junos
  tasks:
    - name: "Get BGP Neighbours Data"
      junos_command:
        commands: show bgp neighbor
        display: xml
      register: bgp_output

    - name: Debug bgp output
      debug:
        var: bgp_output

    - name: "Extract BGP Neighbour Data"
      set_fact:
        bgp_peers: "{{ bgp_output.output[0]['rpc-reply']\
                        ['bgp-information']['bgp-peer'] }}"

    - name: "Ensure all the peer state is established"
      assert:
        that: item['peer-state'] == 'Established'
        fail_msg: "Peer on Interface {{item['local-interface-name']}} is Down"
        success_msg: "Peer on Interface {{item['local-interface-name']}} is UP"
      when: item['local-interface-name'] is defined
      loop: "{{bgp_peers}}"
      ignore_errors: yes
Run it with: ansible-playbook pb_get_bgp_peers.yml
To get operational data in text form for a log we can use junos_command without the xml option:
Create pb_collect_output.yml:
---
- name: Collect Network Logs
  hosts: junos
  vars:
    log_folder: "logs"
    op_cmds:
      - show bgp neighbor
  tasks:
    - name: "P1T1: Build Directories to Store Data"
      block:
        - name: "Create folder to store Device config"
          file:
            path: "{{ log_folder }}"
            state: directory
      run_once: yes
      delegate_to: localhost

    - name: "P1T2: Get Running configs from Devices"
      junos_command:
        commands: "{{ item }}"
      loop: "{{ op_cmds }}"
      register: logs_output

    - name: "P1T3: Save Running Config per Device"
      copy:
        content: "{{ item.stdout[0] }}"
        dest: "{{ log_folder }}/{{inventory_hostname}}_{{ item.item | regex_replace(' ','_') }}.txt"
      loop: "{{ logs_output.results }}"
      delegate_to: localhost
Validating the Network State with pyEZ operational tables#
Install pyez and the required roles
pip install junos-eznc
ansible-galaxy install Juniper.junos
Create a playbook pb_juniper_pyez_table.yml:
---
- name: Validate BGP State using PyEZ Tables
  hosts: junos
  roles:
    - Juniper.junos
  tasks:
    - name: Retrieve BGP Neighbor Information Using PyEZ Table
      juniper_junos_table:
        file: "bgp.yml"
      register: jnpr_pyez_bgp

    - name: Validate all BGP Peers are operational
      assert:
        that:
          - item.peer in jnpr_pyez_bgp.resource | map(attribute='peer_id') | list
        fail_msg: " BGP Peer {{ item.peer }} is Not Operational"
      loop: "{{ bgp_peers }}"
bgp.ymlis present as part of the pyez
Run it with: ansible-playbook pb_juniper_pyez_table.yml
The official ansible junos information
These are additional modules maintained by juniper - not part of the ansible standard library.
The library is an ansible role stored on ansible-galay
The juniper PyEZ library provides a simple robust API to communicate with juniper devices.
$ tree ~/.Ansible/roles/Juniper.junos/library/
/Users/stephen/.Ansible/roles/Juniper.junos/library/
├── juniper_junos_command.py
├── juniper_junos_config.py
├── juniper_junos_facts.py
├── juniper_junos_jsnapy.py
├── juniper_junos_ping.py
├── juniper_junos_pmtud.py
├── juniper_junos_rpc.py
├── juniper_junos_software.py
├── juniper_junos_srx_cluster.py
├── juniper_junos_system.py
└── juniper_junos_table.py
The data returned looks like:
ok: [vqfx2] => {
    "jnpr_pyez_bgp": {
        "changed": false,
        "failed": false,
        "msg": "Successfully retrieved 4 items from bgpTable.",
        "resource": [
            {
                "local_address": "10.10.3.2+179",
                "local_as": "60002",
                "local_id": "1.1.1.2",
                "peer_as": "60001",
                "peer_id": "1.1.1.1",
                "route_received": "6"
            },
            {
                "local_address": "unspecified",
                "local_as": "60002",
                "local_id": null,
                "peer_as": "60001",
                "peer_id": null,
                "route_received": null
            },
            {
                "local_address": "10.10.5.2+55001",
                "local_as": "60002",
                "local_id": "1.1.1.2",
                "peer_as": "60001",
                "peer_id": "1.1.1.1",
                "route_received": "6"
            },
            {
                "local_address": "10.10.6.2+179",
                "local_as": "60002",
                "local_id": "1.1.1.2",
                "peer_as": "60001",
                "peer_id": "1.1.1.1",
                "route_received": "6"
            }
        ],
    }
}
More info on pyez tables and views
4. Building Data Centre Networks with Arista#
Lots of info in the book, but I am skipping this chapter…
Terms:
- VLAN - Virtual Local Area Network
- VXLAN - Virtual Extible LANS
- BGP/EVPN - Border Gateway Protocol/Ethernet Virtual Private Network
5. Automating Application Delivery with F5 LTM and Ansible#
F5 BIGIP are LB (Load Balancers) and a LTM (Local Traffic Manager)
6. Administering a Multi-vendor Network with Napalm and Ansible#
NAPALM - Network Automation and Programmability Abstraction Layer with Multivendor Support
In previous examples we have used vendor specific libraries. Writing playbooks forces certain boundaries between veendors. Napalm lets you write a single playbook applicable to all vendors.
A list of Napalm supported devices
Installing NAPALM modules#
Make a folder ch6_napalm
pip install napalm-ansible
Then run napalm-ansible, it will tell you to modify your ansible.cfg to ensure it can access napalm
Add to the ansible.cfg (your library and action_plugins will be different):
[defaults]
inventory=hosts
retry_files_enabled=False
gathering=explicit
host_key_checking=False
library = /usr/local/lib/python3.6/site-packages/napalm_ansible/modules
action_plugins = /usr/local/lib/python3.6/site-packages/napalm_ansible/plugins/action
Unfortunately you need an account with cisco to get the OVA for creating a cisco router in our topology. So I will skip it, but you can most certainly run a cisco router virtually
I will use the same hosts as chp3_junos
Segmenting groups into OS / vendor is a best practice - since this will give info to NAPALM on how to interact with the device
In the group_vars you would set ansible_connection as netconf for juniper devices. For cisco iosxr - network_cli is used.
You can always test connectivity to the devices with:
$ ansible all -m ping
vqfx1 | SUCCESS => {
    "changed": false,
    "ping": "pong"
}
vqfx2 | SUCCESS => {
    "changed": false,
    "ping": "pong"
}
More info in the book
7. Deploying and Operating AWS Network Resources with Ansible#
…More in the book
8. Deploying and Operating Azure Network Resources with Ansible#
More in the book…
9. Deploying and Operating GCP Network Resources with Ansible#
More in the book…
10. Network Validation with Batfish and Ansible#
Sometimes it is important to valid the network before pushing configuration to the devices.
Batfish is a tool that provides offline network validation. It can validate security, compliance and traffic forwarding.
It uses device configuration to create a neutral data model and forwarding tree for our network.
A client-server model, client is python pybatfish and server is a java based.
We initialise a snapshot, then ask questions using the client.
Batfish server is distributed as a container…so you can deploy that on docker or kubernetes.
On docker:
docker pull batfish/batfish
docker run -d -p 9997:9997 -p 9996:9996 batfish/batfish
It runs on port 9996 and 9997
Integrating Batfish with Ansible#
Install batfish
mkdir ch10_batfish
cd ch10_batfish
python3 -m venv env
source env/bin/activate
python3 -m pip install --upgrade pybatfish
Download the batfish role
ansible-galaxy install batfish.base
Ensure batfish is installed
$ pip freeze | grep batfish
pybatfish==2020.12.23.763
List the source code for the role
$ tree ~/.ansible/roles/batfish.base/library/
/Users/stephen/.ansible/roles/batfish.base/library/
├── bf_assert.py
├── bf_extract_facts.py
├── bf_init_snapshot.py
├── bf_session.py
├── bf_set_snapshot.py
├── bf_upload_diagnostics.py
└── bf_validate_facts.py
Generating the Network Configuration#
The idea is have a source of truth and set of yaml variables as the source of truth. Build the configuration from those files. Upload to batfish and test that. Then once that is done you can safely deploy to the device.
I am going to use the config earlier:
$ ls ch3_junos/configs/
vqfx1.cfg  vqfx2.cfg
Creating a Network Snapshot for Batfish#
Create a playbook pb_batfish_analysis.yml
---
- name: Extract network device facts using Batfish and Ansible
  hosts: all
  gather_facts: no
  roles:
    - batfish.base
  vars:
    ansible_connection: local
    batfish_host: 172.20.100.101
    config_dir: configs
    batfish_network_folder: batfish_net_snapshot
    batfish_analysis_folder: batfish_analysis
  tasks:

  - name: Create a Batfish Config Directory
    file:
      path: "{{ batfish_network_folder }}"
      state: directory
    run_once: yes

  - name: copy All configs to Batfish Directory
    copy:
      src: "{{ config_dir }}"
      dest: "{{ batfish_network_folder }}"
    run_once: yes
The directory structure required is: network -> configs -> xxxx.cfg…
$ tree batfish_net_snapshot/
batfish_net_snapshot/
└── configs
    ├── vqfx1.cfg
    └── vqfx2.cfg

1 directory, 2 files
We use
run_onceso that a task is not run for each node - which is sub-optimal
More info on interacting with batfish
Setup the connection to batfish
  - name: Setup connection to Batfish service
    bf_session:
      host: "{{ batfish_host }}"
      name: local_batfish
    register: bf_session
    run_once: yes
bf_sessionopens the session between the batfish client and the server.
Initialise the snapshot
  - name: Initialize the Network Snapshot
    bf_init_snapshot:
      network: juniper_provider_edge
      snapshot: juniper_provider_edge_config
      snapshot_data: "{{ batfish_network_folder }}"
      overwrite: true
    run_once: yes
    register: bf_snapshot
br_init_snapshotis used to initialise the network snapshot - building the neutral data model. Any problems with parsing will be output.
Collecting Network Facts from Batfish#
Collecting facts and how to collect these facts to validate network configuration is per the intended state.
Retrieve batfish facts
  - name: Retrieve Batfish Facts
    bf_extract_facts:
      output_directory: "{{ batfish_analysis_folder }}/bf_facts"
    run_once: yes
    register: bf_facts
Validate the interface configuration that was generated
  - name: Validate all Interfaces are Operational and Have correct IP
    assert:
      that:
      - bf_facts.result.nodes[inventory_hostname].Interfaces[item.port].Active
== true
      - bf_facts.result.nodes[inventory_hostname].Interfaces[item.port].Primary_Address ==
        item.ip + '/' + global.p2p_prefix | string
    loop: "{{ p2p_ip[inventory_hostname] }}"
We are validating that the config has the required interfaces and the correct ip address
bf_extract_factsis used to get facts from batfish - which can be stored asyamlfiles
Batfish also includes it’s own assert tests:
- name: Validate BGP Sessions and Undefined References
  bf_assert:
    assertions:
      - type: assert_no_undefined_references
        name: Confirm we have no undefined references
      - type: assert_no_incompatible_bgp_sessions
        name: Confirm we have no incompatible BGP sessions
  run_once: yes
assert_no_undefined_references- validates that all the configuration blocks are present and valid. Ensuring the config is sane.assert_no_incompatible_bgp_sessions- Validates that all BGP sessions are configured correctly and there is no mismatch between peers - ensuring operation BGP sessions
When it fails it should output something like
TASK [Validate BGP Sessions and Undefined References] ************************************************************************************************
fatal: [leaf02]: FAILED! => {"changed": false, "msg": "1 of 2 assertions failed", "result": [{"details": "Assertion passed", "name": "Confirm we have no undefined references", "status": "Pass", "type": "assert_no_undefined_references"}, {"details": "Found incompatible BGP session(s), when none were expected\n[{'Node': 'leaf01', 'VRF': 'default', 'Local_AS': 65001, 'Local_Interface': None, 'Local_IP': '172.31.1.1', 'Remote_AS': '65100', 'Remote_Node': None, 'Remote_Interface': None, 'Remote_IP': '172.31.1.0', 'Address_Families': ListWrapper([]), 'Session_Type': 'EBGP_SINGLEHOP', 'Configured_Status': 'INVALID_LOCAL_IP'}]", "name": "Confirm we have no incompatible BGP sessions", "status": "Fail", "type": "assert_no_incompatible_bgp_sessions"}], "summary": "1 of 2 assertions failed"}
More on batfish assertions and bf_assert
Validating Traffic Forwarding with Batfish#
Forwarding tables generated from device config to validate proper traffic forwarding
- name: Validate Traffic Forwarding in the Fabric
  bf_assert:
    assertions:
      - type: assert_all_flows_succeed
        name: confirm host is reachable for traffic received
        parameters:
          startLocation: "{{ item.0 }}"
          headers:
            dstIps: "{{ item.1.value.ip }}"
            srcIps: "{{ lo_ip[item.0].ip }}"
  with_nested:
    - "{{ play_hosts }}"
    - "{{ lo_ip | dict2items }}"
  run_once: yes
Batfish provides the assert_all_flows_succeed method - validating that flows between 2 endpoints are successful.
The following info is needed to be provided:
- The start node location
- The source IP of the flow
- The destination IP address for the flow
The forwarding table will be created for the topology.
In the above example we validate that all the flows from all the nodes loopback IP addresses can reach the destination loopback IP address on all remote nodes.
Validating ACLs with Batfish#
More info in the book…
11. Building a Network Inventory with Ansible and Netbox#
Previously we used variables defined in yaml files.
We need our network inventory, IP Addresses and VLANs in a central system. Acting as the administrative source of truth for the network.
Netbox is an open source inventory for network infrastructure - initially developed by the digital ocean network engineers.
It has the following features:
- IP Address Management: IP Addresses, VRF’s and VLANs
- Equiptment racks: Organised by groups and sites
- Devices: Types of devices and where they are stored
- Connections: Network, console and power connections between devices.
- Virtualisation: VMs and clusters
- Data circuits
- Secrets: Encrypted sensitive info like passwords
Netbox uses django, postgres and nginx to power the system.
The 3 main cases for its use with ansible:
- Populate data in netbox
- Netbox can be used as a dynamic inventory source
- Netbox can be a source of truth - to provision and configure network devices
Installing Netbox#
Using docker is the simplest way
git clone -b release https://github.com/netbox-community/netbox-docker.git
cd netbox-docker
tee docker-compose.override.yml <<EOF
version: '3.4'
services:
  nginx:
    ports:
      - 8000:8080
EOF
docker-compose pull
docker-compose up
The default credentials are:
Username: admin
Password: admin
API Token: 0123456789abcdef0123456789abcdef01234567
A few containers are required:
Pulling redis         ... done
Pulling redis-cache   ... done
Pulling netbox-worker ... done
Pulling postgres      ... done
Pulling netbox        ... done
Pulling nginx         ... done
Once available you can access it as: http://0.0.0.0:8000/
Integrating Netbox with Ansible#
The python client for netbox pynetbox needs to be installed
pip install pynetbox
Create a new user in netbox for automation activities, assign super user privileges and create a token.
Populating Sites in Netbox#
Sites allow us to group infrastructure based on its physical location.
sites:
  - name: DC1
    description: "Main Data Center in Sydney"
    location: Sydney
  - name: DC2
    description: "Main Data Center in KSA"
    location: Riyadh
Create a roles directory
mkdir roles
cd roles
ansible-galaxy init build_netbox_db
In tasks/main.yml:
---

- name: Create NetBox Sites
  netbox_site:
    netbox_token: "{{ netbox_token }}"
    netbox_url: "{{ netbox_url }}"
    data:
      name: "{{ item.name | lower }}"
      description: "{{ item.description | default(omit) }}"
      physical_address: "{{ item.location | default(omit) }}"
    state: "{{ netbox_state }}"
  loop: "{{ sites }}"
  run_once: yes
  tags: netbox_sites
In roles/build_netbox_db/defaults/main.yml:
netbox_state: present
In a playbook pb_build_netbox_db.yml:
---
- name: Populate NetBox DataBase
  hosts: all
  gather_facts: no
  vars:
    ansible_connection: local
  tasks:
    - import_role:
        name: build_netbox_db
Run the play:
ansible-playbook pb_build_netbox_db.yml
We are using the
netbox_sitemodule which is in the ansible standard library.
We loop over the sites variable and create the sites in netbox
Populating Devices in Netbox#
Creating devices with their model, manufacturer and role in the network. Which we will use later to build a dynamic inventory.
Update group_vars/all.yml with the devices
devices:
  - role: Leaf_Switch
    type: 7020SR
    vendor: Arista
    color: 'f44336'  # red
  - role: Spine_Switch
    type: 7050CX3
    ru: 2
    vendor: Arista
    color: '2196f3'  # blue
Create groups_vars/leaf.yml and group_vars/spine/yml
---
device_model: 7020SR
device_role: Leaf_Switch
vendor: Arista

---
device_model: 7050CX3
device_role: Spine_Switch
vendor: Arista
Create a new task in our role to tasks/create_device_vendors.yml
- name: NetBox Device  // Get Existing Vendors
  uri:
    url: "{{ netbox_url }}/api/dcim/manufacturers/?name={{ device }}"
    method: GET
    headers:
      Authorization: "Token {{ netbox_token }}"
      Accept: 'application/json'
    return_content: yes
    body_format: json
    status_code: [200, 201]
  register: netbox_vendors
  run_once: yes
  tags: device_vendors

- name: NetBox Device  // Create Device Vendors
  uri:
    url: "{{ netbox_url }}/api/dcim/manufacturers/"
    method: POST
    headers:
      Authorization: "Token {{ netbox_token }}"
      Accept: 'application/json'
    return_content: yes
    body_format: json
    body:
      name: "{{ device }}"
      slug: "{{ device | lower }}"
    status_code: [200, 201]
  when:
    - netbox_vendors.json.count == 0
    - netbox_state == 'present'
  run_once: yes
  tags: device_vendors
Update tasks/main.yml and include the tasks:
- name: Create NetBox Device Vendors
  include_tasks: create_device_vendors.yml
  loop: "{{ devices | map(attribute='vendor') | list | unique}}"
  loop_control:
    loop_var: device
  run_once: yes
  tags: device_vendors
Create a task for creating device types roles/build_netbox_db/tasks/create_device_types.yml:
- name: NetBox Device  // Get Existing Device Types
  uri:
    url: "{{ netbox_url }}/api/dcim/device-types/?model={{ device.type }}"
    method: GET
    headers:
      Authorization: "Token {{ netbox_token }}"
      Accept: 'application/json'
    return_content: yes
    body_format: json
    status_code: [200, 201]
  register: netbox_device_types
  run_once: yes
  tags: device_types
- name: NetBox Device  // Create New Device Types
  uri:
    url: "{{ netbox_url }}/api/dcim/device-types/"
    method: POST
    headers:
      Authorization: "Token {{ netbox_token }}"
      Accept: 'application/json'
    return_content: yes
    body_format: json
    body:
      model: "{{ device.type }}"
      manufacturer: { name: "{{ device.vendor }}"}
      slug: "{{ device.type | regex_replace('-','_') | lower  }}"
      u_height: "{{ device.ru | default(1) }}"
    status_code: [200, 201]
  when:
    - netbox_device_types.json.count == 0
    - netbox_state != 'absent'
  register: netbox_device_types
  run_once: yes
  tags: device_types
Include the task in main.yml:
- name: Create NetBox Device Types
  include_tasks: create_device_types.yml
  loop: "{{ devices }}"
  loop_control:
    loop_var: device
  run_once: yes
  tags: device_types
Create the tasks/create_device_roles.yml:
- name: NetBox Device  // Get Existing Device Roles
  uri:
    url: "{{ netbox_url }}/api/dcim/device-roles/?name={{ device.role}}"
    method: GET
    headers:
      Authorization: "Token {{ netbox_token }}"
      Accept: 'application/json'
    return_content: yes
    body_format: json
    status_code: [200, 201]
  register: netbox_device_role
  tags: device_roles
- name: NetBox Device  // Create New Device Roles
  uri:
    url: "{{ netbox_url }}/api/dcim/device-roles/"
    method: POST
    headers:
      Authorization: "Token {{ netbox_token }}"
      Accept: 'application/json'
    return_content: yes
    body_format: json
    body:
      name: "{{ device.role }}"
      slug: "{{ device.role | lower }}"
      color: "{{ device.color }}"
    status_code: [200, 201]
  when:
    - netbox_device_role.json.count == 0
    - netbox_state != 'absent'
  register: netbox_device_role
  tags: device_roles
Include it in the main tasks:
- name: Create NetBox Device Roles
  include_tasks: create_device_roles.yml
  loop: "{{ devices }}"
  loop_control:
    loop_var: device
  run_once: yes
  tags: device_roles
Task to populate devices tasks/create_device.yml
---
- name: Provision NetBox Devices
  netbox_device:
    data:
      name: "{{ inventory_hostname }}"
      device_role: "{{ device_role }}"
      device_type: "{{ device_model }}"
      status: Active
      site: "{{ inventory_hostname.split('-')[0] }}"
    netbox_token: "{{ netbox_token }}"
    netbox_url: "{{ netbox_url }}"
    state: "{{ netbox_state }}"
  register: netbox_device
  tags: netbox_devices
Include it in the main:
- name: Create NetBox Device
  include_tasks: create_device.yml
  tags: netbox_devices
In order to create a device you need to:
- Create all the device manufacturers /vendors
- Create all the device models
- Create all the device roles
There is no prebuilt module for this info - so we need to use the uri module to send HTTP requests
First getting all existing devices vendors, models and roles and then adding new ones if they are not present
Then we can use netbox_device build in module to popualte netbox
More on the Netbox API information
Populating Interfaces in Netbox#
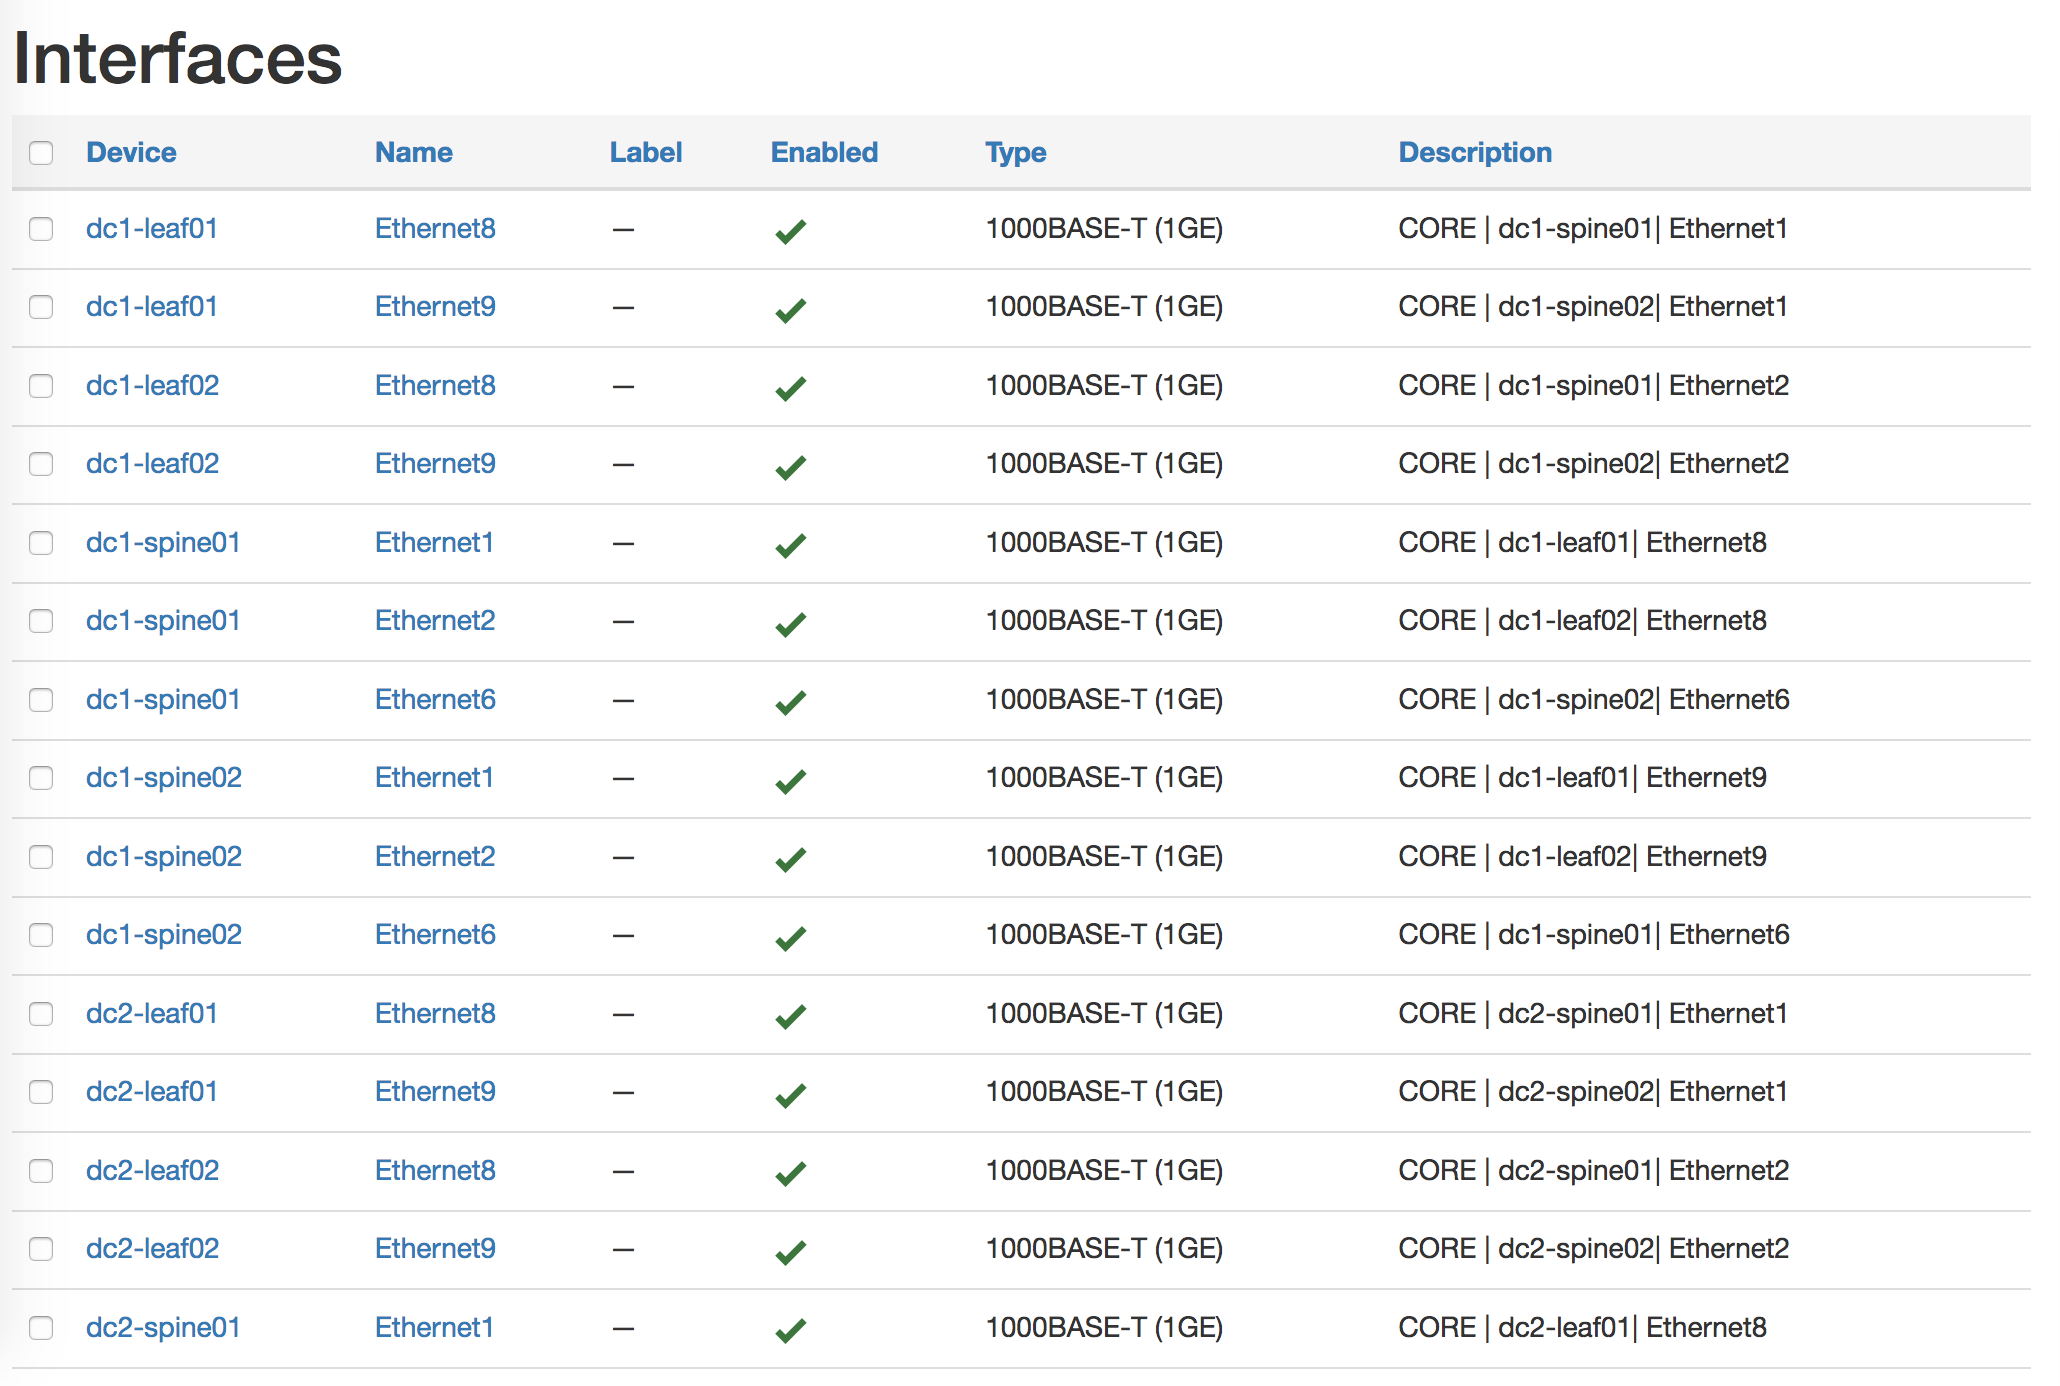
Specify group_vars/all.yml with the point-to-point fabric:
p2p_ip:
  dc1-leaf01:
    - {port: Ethernet8, ip: 172.10.1.1/31 , peer: dc1-spine01, pport: Ethernet1, peer_ip: 172.10.1.0/31}
    - {port: Ethernet9, ip: 172.10.1.5/31 , peer: dc1-spine02, pport: Ethernet1, peer_ip: 172.10.1.4/31}
  dc1-leaf02:
    - {port: Ethernet8, ip: 172.10.1.3/31 , peer: dc1-spine01, pport: Ethernet2, peer_ip: 172.10.1.2/31}
    - {port: Ethernet9, ip: 172.10.1.7/31 , peer: dc1-spine02, pport: Ethernet2, peer_ip: 172.10.1.6/31}
  dc1-spine01:
    - {port: Ethernet1, ip: 172.10.1.0/31 , peer: dc1-leaf01, pport: Ethernet8, peer_ip: 172.10.1.1/31}
    - {port: Ethernet2, ip: 172.10.1.2/31 , peer: dc1-leaf02, pport: Ethernet8, peer_ip: 172.10.1.3/31}
    - {port: Ethernet6, ip: 172.10.1.8/31 , peer: dc1-spine02, pport: Ethernet6, peer_ip: 172.10.1.9/31}
  dc1-spine02:
    - {port: Ethernet1, ip: 172.10.1.4/31 , peer: dc1-leaf01, pport: Ethernet9, peer_ip: 172.10.1.5/31}
    - {port: Ethernet2, ip: 172.10.1.6/31 , peer: dc1-leaf02, pport: Ethernet9, peer_ip: 172.10.1.7/31}
    - {port: Ethernet6, ip: 172.10.1.9/31 , peer: dc1-spine01, pport: Ethernet6, peer_ip: 172.10.1.8/31}
  dc2-leaf01:
    - {port: Ethernet8, ip: 172.11.1.1/31 , peer: dc2-spine01, pport: Ethernet1, peer_ip: 172.11.1.0/31}
    - {port: Ethernet9, ip: 172.11.1.5/31 , peer: dc2-spine02, pport: Ethernet1, peer_ip: 172.11.1.4/31}
  dc2-leaf02:
    - {port: Ethernet8, ip: 172.11.1.3/31 , peer: dc2-spine01, pport: Ethernet2, peer_ip: 172.11.1.2/31}
    - {port: Ethernet9, ip: 172.11.1.7/31 , peer: dc2-spine02, pport: Ethernet2, peer_ip: 172.11.1.6/31}
  dc2-spine01:
    - {port: Ethernet1, ip: 172.11.1.0/31 , peer: dc2-leaf01, pport: Ethernet8, peer_ip: 172.11.1.1/31}
    - {port: Ethernet2, ip: 172.11.1.2/31 , peer: dc2-leaf02, pport: Ethernet8, peer_ip: 172.11.1.3/31}
    - {port: Ethernet6, ip: 172.11.1.8/31 , peer: dc2-spine02, pport: Ethernet6, peer_ip: 172.11.1.9/31}
  dc2-spine02:
    - {port: Ethernet1, ip: 172.11.1.4/31 , peer: dc2-leaf01, pport: Ethernet9, peer_ip: 172.11.1.5/31}
    - {port: Ethernet2, ip: 172.11.1.6/31 , peer: dc2-leaf02, pport: Ethernet9, peer_ip: 172.11.1.7/31}
    - {port: Ethernet6, ip: 172.11.1.9/31 , peer: dc2-spine01, pport: Ethernet6, peer_ip: 172.11.1.8/31}
Create a task to create interfaces tasks/create_device_intf.yml
- name: Create Fabric Interfaces on Devices
  netbox.netbox.netbox_device_interface:
    netbox_token: "{{ netbox_token }}"
    netbox_url: "{{ netbox_url }}"
    data:
      device: "{{ inventory_hostname }}"
      name: "{{ item.port }}"
      description: "{{ item.type | default('CORE') }} | {{ item.peer }}| {{ item.pport }}"
      enabled: true
      mode: Access
      type: "1000Base-T (1GE)"
    state: "{{ netbox_state }}"
  loop: "{{ p2p_ip[inventory_hostname] }}"
  when: p2p_ip is defined
  tags: netbox_intfs
Add to main.yml:
- name: Create NetBox Device Interfaces
  include_tasks: create_device_intf.yml
  tags: netbox_intfs
Ater creatingt the P2P links variables for the fabric, we use
netbox_interfacemodule to create all the links in Netbox. We can also manage the maangement and loopback interfaces
In ansible 2.10 the netbox interface module changed to a collection netbox_device_interface
ansible-galaxy collection install netbox.netbox
Then use this in the playbook: netbox.netbox.netbox_device_interface
Check the netbox_device_interface
For some reason the
typewas required
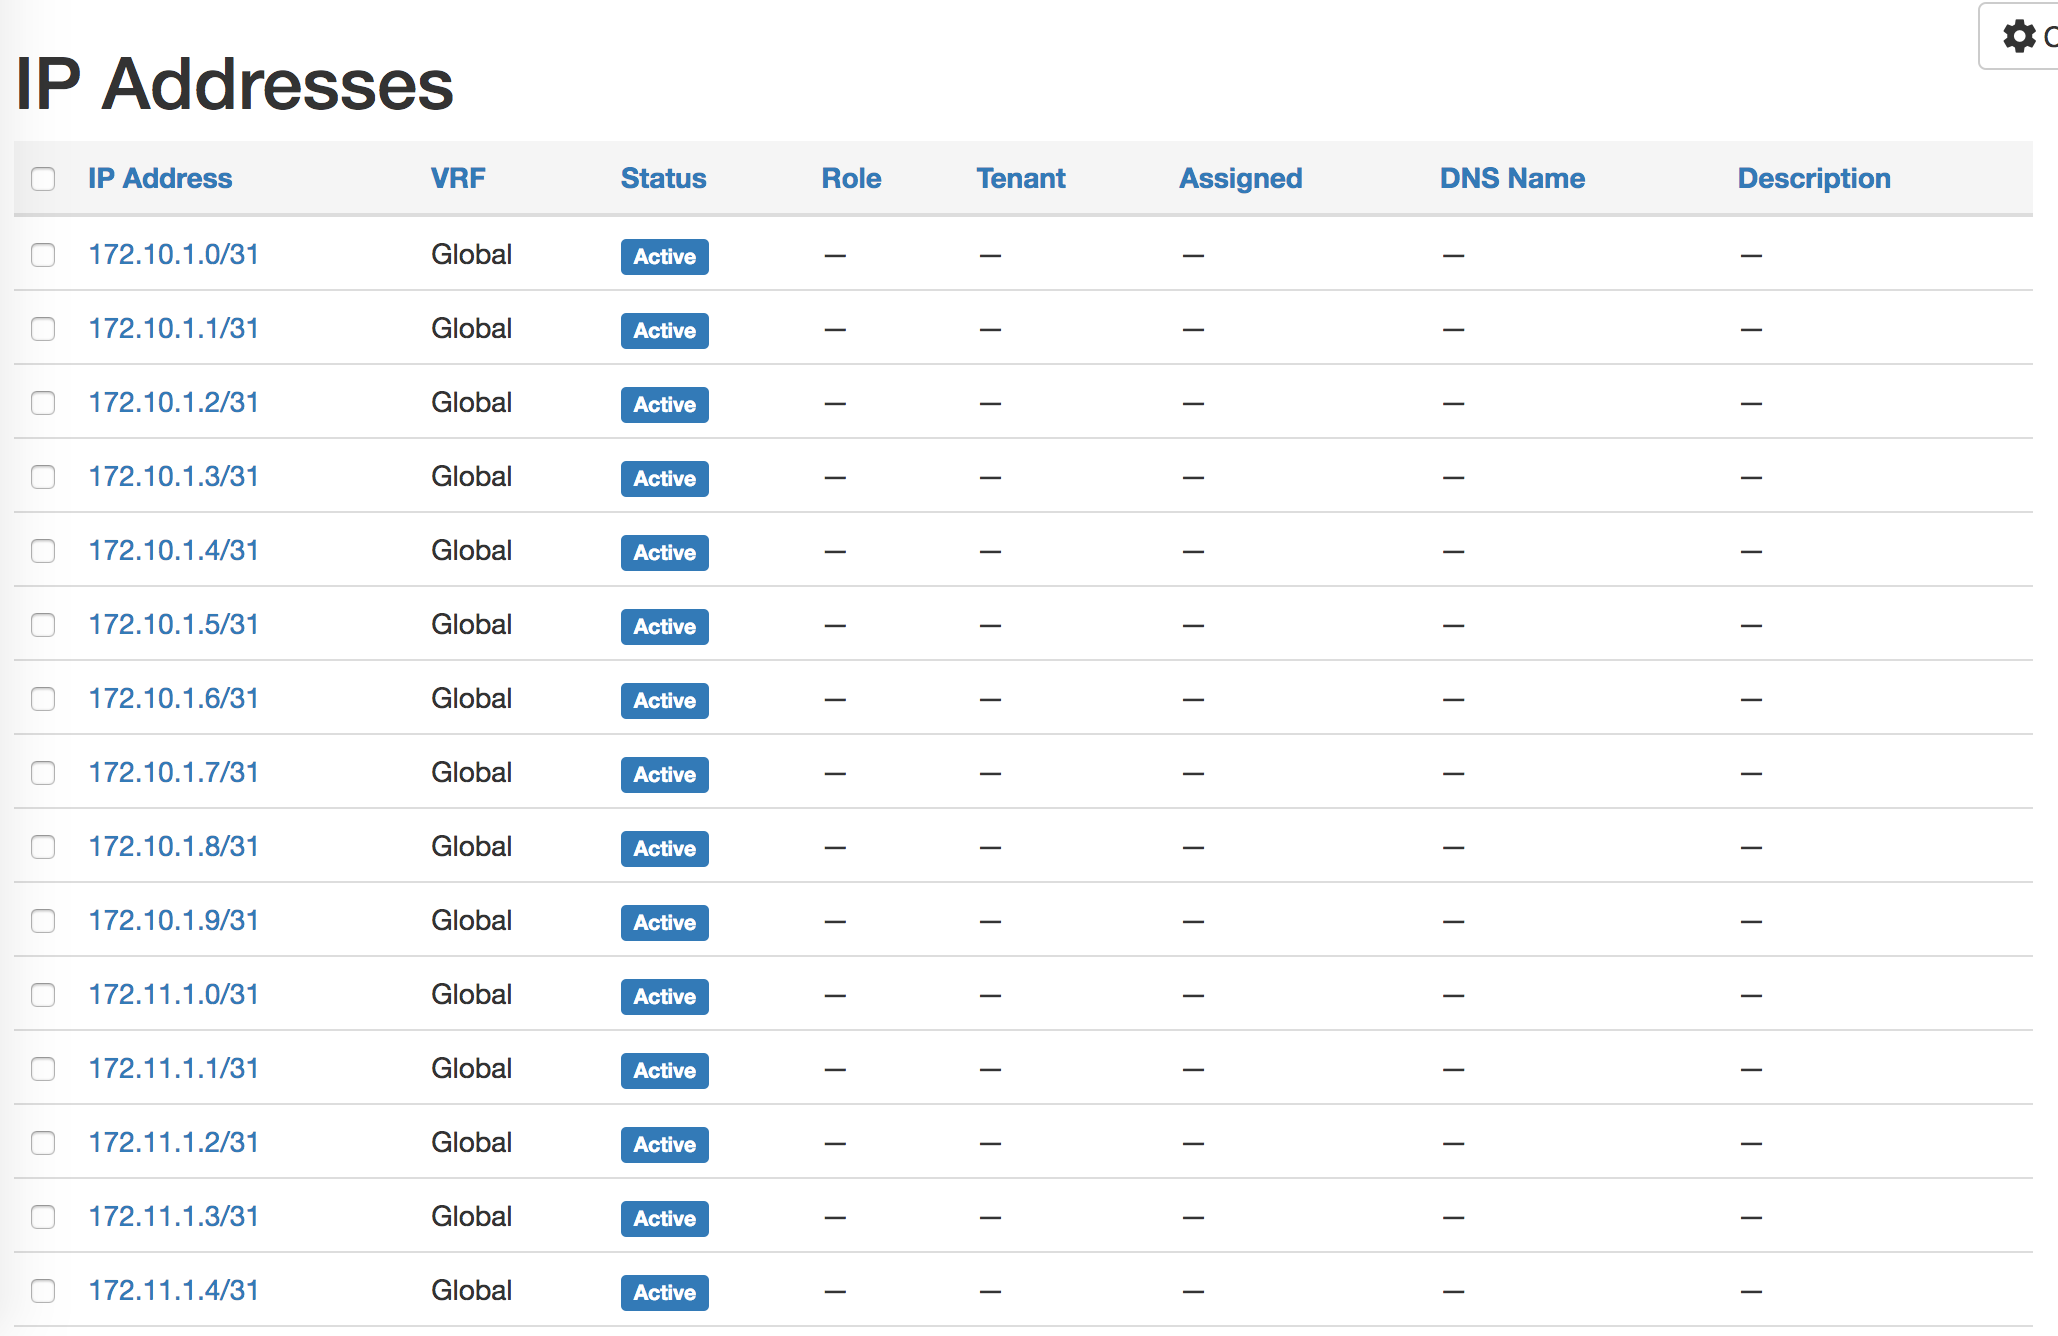
Populating IP addresses in Netbox#
Create ip addresses and bind with interfaces.
Create create_device_intf_ip.yml:
- name: Create Fabric IPs
  netbox_ip_address:
    netbox_token: "{{ netbox_token }}"
    netbox_url: "{{ netbox_url }}"
    data:
      address: "{{ item.ip }}"
      interface:
        name: "{{ item.port }}"
        device: "{{ inventory_hostname }}"
    state: "{{ netbox_state }}"
  loop: "{{ p2p_ip[inventory_hostname] }}"
  tags: netbox_ip
Add the role to main.yml:
- name: Create NetBox Device Interfaces IP Address
  include_tasks: create_device_intf_ip.yml
  tags: netbox_ip
The p2p_ip data structure holds the ip addresses assigned on each interface - the same process for management and loopback ips.
More on the netbox ip address module
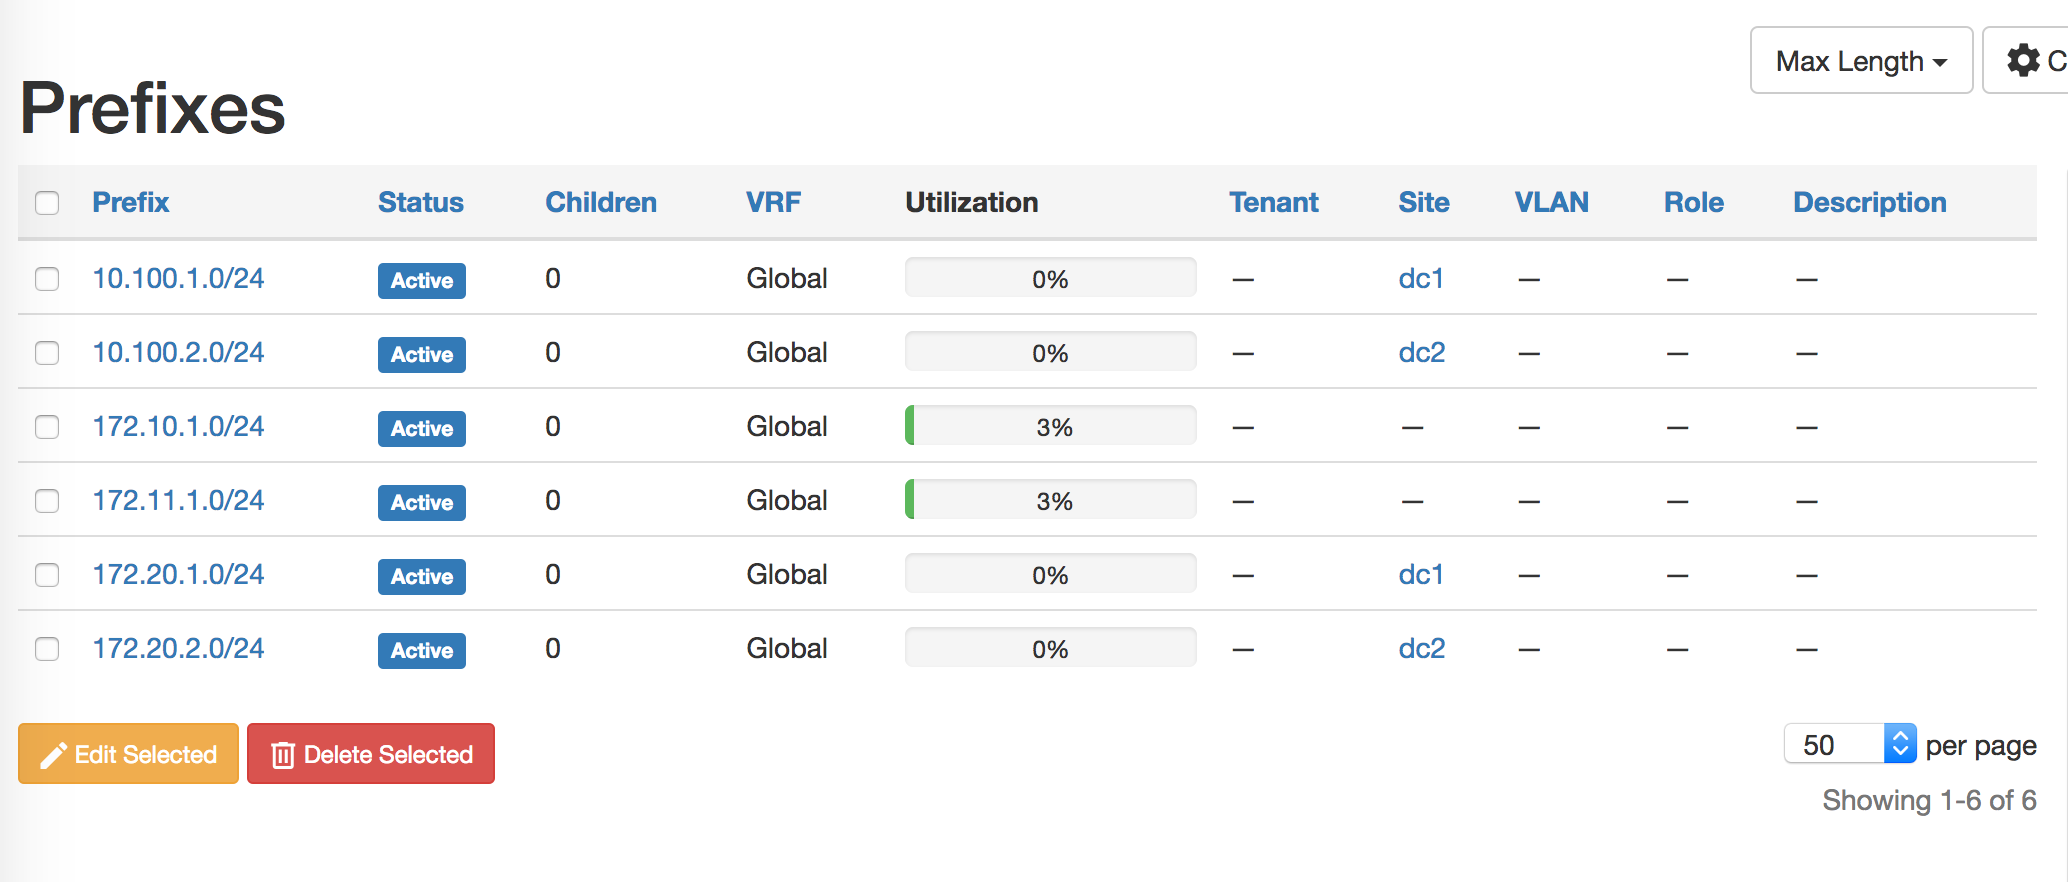
Populating IP Prefixes in Netbox#
Using Netbox as IPAM (IP Address Management) in the network.
Add the subnets to group_vars/all.yml:
subnets:
  -   prefix: 172.10.1.0/24
      role: p2p_subnet
      # site: dc1
  -   prefix: 172.11.1.0/24
      role: p2p_subnet
      # site: dc2
  -   prefix: 10.100.1.0/24
      role: loopback_subnet
      site: dc1
  -   prefix: 10.100.2.0/24
      role: loopback_subnet
      site: dc2
  -   prefix: 172.20.1.0/24
      role: oob_mgmt_subnet
      site: dc1
  -   prefix: 172.20.2.0/24
      role: oob_mgmt_subnet
      site: dc2
Add to main tasks:
- name: Create IP Prefixes
  netbox_prefix:
    netbox_token: "{{ netbox_token }}"
    netbox_url: "{{ netbox_url }}"
    data:
      prefix: "{{ item.prefix }}"
      site: "{{ item.site | default(omit) }}"
      status: Active
    state: "{{ netbox_state }}"
  loop: "{{ subnets }}"
  loop_control:
    label: "{{ item.prefix }}"
  run_once: yes
  tags: netbox_prefix
netbox_prefixis used to create subnets
Using Netbox as a dynamic inventory source#
Netbox acts as the inventory - together with that roles and sites - a dynamic inventory can be built
Create a file netbox_dynamic_inventory/netbox_inventory_source.yml
---
plugin: netbox
api_endpoint: http://172.20.100.111
token: 08be88e25b23ca40a9338d66518bd57de69d4305
group_by:
  - device_roles
  - sites
Create a new playbook netbox_dynamic_inventory/pb_create_report.yml:
---
- name: Create Report from Netbox Data
  hosts: all
  gather_facts: no
  connection: local
  tasks:

    - name: Debug the hostvars from the dynamic inventory
      debug:
        var: hostvars
      run_once: yes

    - name: Build Report
      blockinfile:
        block: |
            netbox_data:
            {% for node in play_hosts %}
              - { node: {{ node }} , type: {{ hostvars[node].device_types[0] }} , mgmt_ip: {{ hostvars[node].inventory_hostname }} }
            {% endfor %}
        path: ./netbox_report.yaml
        create: yes
      delegate_to: localhost
      run_once: yes
In all previous examples we used a static hosts inventory.
With a dynamic inventory it can be built on the fly.
Ansible uses a plugin to speak to a dynamic inventory source. As of ansible 2.9, netbox was introduced as an inventory source.
The plugin is defined in an inventory source yaml file with the:
- Plugin name:
netbox - api endpoint
- token
You can also specify a group_by to break the hosts into groups
Testing the dynamic inventory:
ansible-inventory --list -i netbox_inventory_source.yml
It pulls the host vars and hosts:
The inventory part is:
"all": {
    "children": [
        "device_roles_leaf_switch",
        "device_roles_spine_switch",
        "sites_dc1",
        "sites_dc2",
        "ungrouped"
    ]
},
"device_roles_leaf_switch": {
    "hosts": [
        "dc1-leaf01",
        "dc1-leaf02",
        "dc2-leaf01",
        "dc2-leaf02"
    ]
},
To run the playbook report - we specify the dynamic inventory:
ansible-playbook pb_create_report.yml -i netbox_inventory_source.yml
Check info about the netbox ansible dynamic inventory
Generating a Configuration using Netbox#
In netbox_data.yml:
---
netbox_url: http://172.20.100.111
netbox_token: 08be88e25b23ca40a9338d66518bd57de69d4305
In pb_build_config.yml:
---
- name: Create Report from Netbox Data
  hosts: all
  gather_facts: no
  connection: local
  tasks:
    - name: Read netbox Data
      include_vars: netbox_data.yml
      run_once: yes

    - name: Get Data from Netbox
      uri:
        url: "{{ netbox_url }}/api/dcim/interfaces/?device={{ inventory_hostname }}"
        method: GET
        headers:
        Authorization: "Token {{ netbox_token }}"
        Accept: 'application/json'
        return_content: yes
        body_format: json
        status_code: [200, 201]
      register: netbox_interfaces
      delegate_to: localhost
      run_once: yes

    - name: Push Config to device
      eos_config:
        lines:
          - description {{ port.description }}
        parent: interface {{ port.name }}
      loop: "{{ netbox_interfaces.json.results }}"
      loop_control:
        loop_var: port
      vars:
        ansible_connection: network_cli
        ansible_network_os: eos
After getting the config from netbox
12. Simplifying Automation with AWX#
More info in the book
13. Advanced Techniques and Best Practices for Ansible#
Installing Ansible in a Virtual Environment#
python3 -m venv env
source env/bin/activate

pip3 install ansible==2.9
This is good as we won’t use and clog up the system level python and ansible, we can have a self-contained environment to run our playbooks
We can also run seperate ansible versions in different projects
By default ansible will try use the system level python in /usr/bin/python
To override that we can use the hosts inventory:
[all:vars]
ansible_python_interpreter=/Users/stephen/projects/cookbook/env/bin/python
It can also be set in ansible.cfg:
[defaults]
...
interpreter_python=./env/bin/python
Validating YAML and Ansible Playbooks#
Install the required packages
pip3 install yamllint
pip3 install ansible-lint
Run yamllint on all files in a folder
yamllint .
Run ansible-lint on a specific playbook
ansible-lint pb.yml
If there are no errors, just warning, the return code will be 0
echo $?
0
If there are errors:
echo $?
1
A .yamllint file can be created for setting rules for the linting
---
extends: default
rules:
  line-length:
    level: warning
In the above case, line length errors have changed to warnings.
Ansible-lint tips:
ansible-lint -L: output all the rules and short descriptionansible-lint -T: output all the rules and tags
Check the yamllint docs and the ansible-lint docs
Calculating the execution time for Playbooks#
Add to ansible.cfg:
[defaults]
callback_whitelist=timer, profile_tasks, profile_roles
List all the tasks in your playbook:
ansible-playbook pb_basic_config.yml --list-tasks
Run the playbook:
ansible-playbook pb_basic_config.yml

Playbook run took 0 days, 0 hours, 0 minutes, 21 seconds
Monday 18 January 2021  09:03:13 +0200 (0:00:01.516)       0:00:21.669 ********
===============================================================================
build_router_config : System Configuration ----------------------------------------------- 2.41s
build_router_config : Create Config Directory -------------------------------------------- 1.89s
build_router_config : BGP Configuration -------------------------------------------------- 1.84s
build_router_config : Interface Configuration -------------------------------------------- 1.75s
build_router_config : MPLS Configuration ------------------------------------------------- 1.73s
build_router_config : Build Final Device Configuration ----------------------------------- 1.73s
build_router_config : Ansible check fodlers ---------------------------------------------- 1.71s
build_router_config : Create Temp Directory per Node ------------------------------------- 1.62s
build_router_config : Remove Old Assembled Config ---------------------------------------- 1.54s
build_router_config : Remove Build Directory --------------------------------------------- 1.52s
build_router_config : SET FACT >> Build Directory ---------------------------------------- 1.35s
build_router_config : debug -------------------------------------------------------------- 1.27s
build_router_config : Debug the tmp directory -------------------------------------------- 1.27s
Monday 18 January 2021  09:03:13 +0200 (0:00:01.525)       0:00:21.676 ********
===============================================================================
build_router_config ---------------------------------------------------- 21.64s
~~~~~~~~~~~~~~~~~~~~~~~~~~~~~~~~~~~~~~~~~~~~~~~~~~~~~~~~~~~~~~~~~~~~~~~~~~~~~~~
total ------------------------------------------------------------------ 21.64s
The plugins we enabled:
timer: This plugin provides a summary of the execution time for the playbook.profile_tasks: This provides us with a summary of the execution time of each task within a playbook.profile_roles: This provides us with a summary of the time taken for each role within a playbook.
Check out ansible callback plugins
Validating User Input with Ansible#
We rely heavily on hosts and group_vars. We should verify the integrity of this data before running playbooks.
Create acl.yml:
---
ACLs:
  INFRA_ACL:
    - src: 10.1.1.0/24
      dst: any
      dport: ssh
      state: present
    - src: 10.2.1.0/24
      dst: any
      app: udp
      dport: snmp
      state: present
Create a validate_acl.yml file:
---
- include_vars: ACLs.yml

- name: Validate ACL is Defined
  assert:
    that:
      - ACLs is defined
      - "'INFRA_ACL' in ACLs.keys()"
      - ACLs.INFRA_ACL|length > 0

- name: Validate Rules are Valid
  assert:
    that:
      - item.src is defined
      - item.dst is defined
      - item.src | ipaddr
  loop: "{{ ACLs.INFRA_ACL }}"
then ensure that you run the validation in your deploy playbook:
---
- name: Configure ACL on IOS-XR
  hosts: all
  tasks:
    - name: Validate Input Data
      import_tasks: validate_acls.yml
      run_once: yes
      delegate_to: localhost
      tags: validate
    - name: Create ACL Config
      template:
        src: acl.j2
        dest: acl_conf.cfg
      delegate_to: localhost
      run_once: yes
    - name: Provision ACLs
      iosxr_config:
        src: acl_conf.cfg
        match: line
This will save you from getting burned when variables are not what you expect them to be
Running Ansible in Check Mode#
check mode prevents any changes on remote managed nodes
Add this extra ACL to acl.yml:
- src: 10.3.2.0/24
  dst: 10.2.2.0/24
  dport: dns
  state: present
Run the play in check mode
ansible-playbook deploy_acls.yml -l den-core01 --check
To see what would have changed run:
ansible-playbook pb_push_acl.yml -l den-core01 --check --diff
We can also use check mode in our playbook to decided when to run or skip tasks:
- name: Configure ACL on IOS-XR
  hosts: all
  serial: 1
  tags: deploy
  tasks:
    - name: Backup Config
      iosxr_config:
        backup:
      when: not ansible_check_mode
    - name: Deploy ACLs
      iosxr_config:
        src: acl_conf.cfg
        match: line
      when: not ansible_check_mode
With the
ansible_check_modevariable will only run those tasks when not in check mode
More on check mode
Controlling Paralellism and Rolling Updates#
In you ansible.cfg:
[defaults]
forks=2
Update pb_push_acl.yml:
- name: Configure ACL on IOS-XR
  hosts: all
  serial: 1
  tags: deploy
  tasks:
    - name: Backup Config
      iosxr_config:
        backup:
    - name: Deploy ACLs
      iosxr_config:
        src: acl_conf.cfg
        match: line
Ansible by default executes in parallel - forking 5 parallel threads
Note: local_action and deletegate_to should be kept to a minimum as these tasks fork a python interpreter
In order to execute one at a time we will use serial: 1 - ie. Run all tasks on the first, then second etc.
Rather than run first tasks for all hosts…
Configuring Fact Caching in Ansible#
Enable fact caching in ansible.cfg:
[defaults]
fact_caching=yaml
fact_caching_connection=./fact_cache
Create pb_get_facts.yml:
---
- name: Collect Network Facts
  hosts: all
  tasks:
    - name: Collect Facts Using Built-in Fact Modules
      iosxr_facts:
        gather_subset:
          - interfaces
    - name: Collect Using NAPALM Facts
      napalm_get_facts:
        hostname: "{{ ansible_host }}"
        username: "{{ ansible_user }}"
        password: "{{ ansible_ssh_pass }}
        dev_os: "{{ ansible_network_os }}"
        filter:
          - interfaces
    - name: Set and Cache Custom Fact
      set_fact:
          site: Egypt
          cacheable: yes
Run the play on a single node:
ansible-playbook pb_validate_from_cache.yml -l den-core01
The facts are cached on teh control node to speed up the playbook
More in the book
Creating custom python filters for ansible#
Ansible provides the built-in and jinja2 filters to manipulate data. Soemtimes there is no better way but to create your own.
Create a filter_plugins folder
Create a file called filter.py
class FilterModule(object):
    def filters(self):
        return {
            'acl_state': self.acl_state
        }
    def acl_state(self,acl_def):
        for acl_name, acl_rules in acl_def.items():
            for rule in acl_rules:
                rule['state'] = rule['state'].upper()
        return acl_def
Create pb_test_custom_filter.yml:
---
- name: Test custom filter
  hosts: all
  vars:
    ansible_connection: local
  tasks:
  - name: Read ACL data
    include_vars: acl.yml
    run_once: yes

  - name: Apply our custom filter
    set_fact:
      standard_acl: "{{ ACLs | acl_state }}"
    run_once: yes

  - name: Display output after Filter
    debug: var=standard_acl
Custom filters must be in a folder called
filter_plugins
The filter library is extended, the function filters must return a ditionary of all custom filters we define.
We can also pass values to filters
class FilterModule(object):

    ...

    def custom_acl(self,acl_def,field=None):
        for acl_name, acl_rules in acl_def.items():
            for rule in acl_rules:
                if field and field in rule.keys():
                    rule[field] = rule[field].upper()
        return acl_def

    def filters(self):
        return {
            'acl_state': self.acl_state,
            'custom_acl': self.custom_acl
        }
Using the new custom filter:
- name: Apply Our Custom Filter
        set_fact:
          standard_acl: "{{ ACLs | acl_state }}"
          final_acl: "{{ ACLs | custom_acl('dports') }}"
        run_once: yes
- name: Display Output After Filter
  debug: var=final_acl